AR67.30-D-2301A | Remove/install side window between C and D-pillars | 15.11.11 |
MODEL 903.662
with CODE (ZU8) National version for USA
with CODE (Z29) "James Cook" touring camper, NAFTA
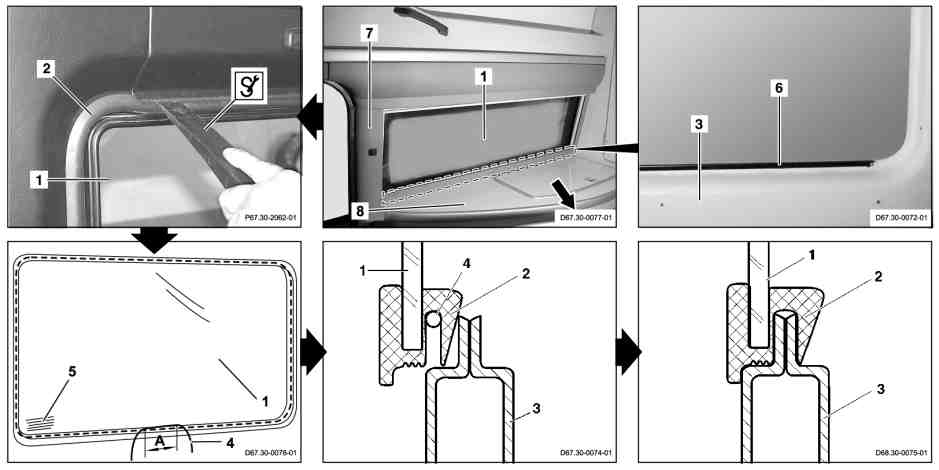
D67.30-0079-09
1 Side window
2 Sealing rubber
3 Body flange
7 Cover
8 Stowage cabinet
4 Pulling cord
5 Imprint
6 Spacer rail
| Removing | ||
Danger! | Risk of injury caused by scraping or cutting body parts on sharp vehicle parts | Always wear protective gloves when working on or near sharp and non-deburred vehicle parts. Deburr repair panels. | |
Danger! | Risk of injury caused by body parts becoming pinched, crushed or severed by doors, covers, flaps or by loose components | Keep body parts well clear when moving doors, covers, flaps and components. Wear protective gloves and protective shoes. | |
Danger! | Risk of injury due to hands being crushed when window glass is not secure | Secure window to prevent it from falling down. | |
1 | Remove C-pillar paneling (7) | Right side | |
2 | Detach stowage cabinet (8) | Refrigerator box | |
3 | Slightly pull stowage cabinet (8) for refrigerator box from side wall paneling toward center of vehicle (arrow) | Until sufficient access to rubber seals (2) on side window (1) is ensured. | |
4 | Remove wardrobe stowage shelf | ||
5 | Install two cup suction tools on outside of side window (1) | Cup suction tool/shackle (for removing and installing windows) gotis://K_67.0_03.0 | |
6 | Pry sealing rubber lip (2) from interior compartment over edge of body flange (3) of side wall paneling toward outside. | Helper holds side window (1) with cup suction tools. | |
Cup suction tool/shackle (for removing and installing windows) gotis://K_67.0_03.0 | |||
Assembly wedge | |||
7 | Remove side window (1) using cup suction tools. | ||
8 | Remove sealing rubber (2) from side window (1). | Check sealing rubber (2) and side window (1) for reusability. | |
| Install | ||
9 | Check whether spacer rail (6) seats correctly. | ||
10 | Install sealing rubber (2) on edge of side window (1). | Install chamfered, long sealing rubber lip (2) toward interior compartment The imprint (5) should be located at the bottom of the side window (1) after installation. | |
11 | Lay pulling cord (4) all the way around the side window (1) below the long sealing rubber lip (2) | Allow pulling cord (4) to overlap 10 cm (A) at the bottom of the side window (1). | |
12 | Coat chamfered side of sealing rubber (2) with lubricant | Antifriction agent | |
13 | Press side window (1) on body flange (3) of side wall paneling. | Press side window (1) with sealing rubber (2) installed uniformly onto side wall paneling body flange (3) from outside | |
Allow free ends of pulling cord (4) to hang into interior compartment. | |||
14 | Uniformly pull free ends of pull-in cord (4) into interior compartment. | The long sealing rubber lip (2) should be positioned all the way around the body flange (3) of the side wall paneling. | |
15 | Check whether sealing rubber lip (2) seats correctly. | Check whether sealing rubber (2) seats correctly inside and outside; correct if necessary. | |
16 | Check whether side window (1) seats correctly. | Check whether side window (1) seats correctly inside and outside; correct if necessary. | |
17 | Remove lubricant residues from side window (1) and sealing rubber (2) | ||
18 | Remove both cup suction tools from outside of side window (1) | Cup suction tool/shackle (for removing and installing windows) gotis://K_67.0_03.0 | |
19 | Install wardrobe stowage shelf. | ||
20 | Slide stowage cabinet (8) for refrigerator box from center of vehicle back to side wall paneling. | ||
21 | Fasten stowage cabinet (8) | Refrigerator box | |
22 | Install C-pillar paneling (7) | Right side | |
23 | Check side window (1) for leaks | Perform water test. | |
24 | Clean side window (1) |

Mounting wedge
110 589 03 59 00
Repair materials
Number | Designation | Order number |
BR00.45-Z-1032-06A | Antifriction agent | A 000 989 08 60 |
Referenced documents
- ar6830d4490a Remove/install paneling on C-pillar
- ar8660d0045a Remove/install stowage cabinet
- ar8660d0061a Remove/install wardrobe storage shelf
- as0000z001701b Risk of injury caused by scraping or cutting body parts on sharp vehicle parts
- as0000z002501a Risk of injury caused by body parts becoming jammed, pinched or severed by doors, covers, flaps or by loose components
- as6700z000201a Risk of injury from contusions to hands if window glass is not secured