Starter
Number | Designation | Engine | Engine | ||
BA15.30-P-1002-01I | Nut, terminal 30 to starter | Nm | 11 | 11 | |
Alternator
Number | Designation | Engines 134.910/911 135.930/950 | ||
BA15.40-P-1001-01J | Nut, circuit B+ to alternator | Nm | 14 | |

P01.00-2496-11
Shown on engine 135.9
1 Disconnect electrical connectors (1, 2)
Installation: Ensure correct seating of seals in electrical connectors (1, 2).
2 Unclip wiring harness (6) bracket on the cylinder head cover (7).
3 Disconnect electrical lines at alternator (G2).
4 Disconnect electrical connector (3) and detach ground line (4).
5 Unclip wiring harness (5) bracket on intake manifold (8).

P01.00-2497-04
6 Disconnect electrical connectors (9, 10)

P01.00-2499-11
Shown on engine 135.9
7 Disconnect electrical connectors (11, 12, 17).
8 Detach bracket (13) from transmission (16).
9 Detach ground line (14) on transmission (16).
10 Unclip wiring harness (15) bracket on engine and transmission (16).
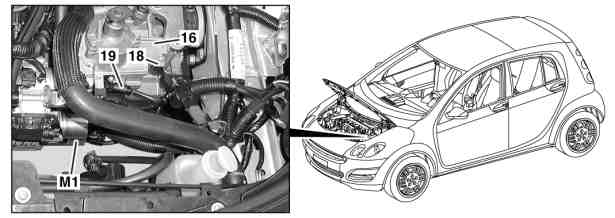
P01.00-2498-04
11 Detach electrical connector (19).
12 Disconnect electrical lines at starter (M1).
13 Detach bracket (18) from transmission (16).

P01.00-2495-06
14 Lift vehicle with lifting platform.
15 Disconnect electrical connectors (20, 21, 22).
16 Remove clips (arrows).
Installation: Replace damaged clips (arrows).
17 Connect in opposite order.