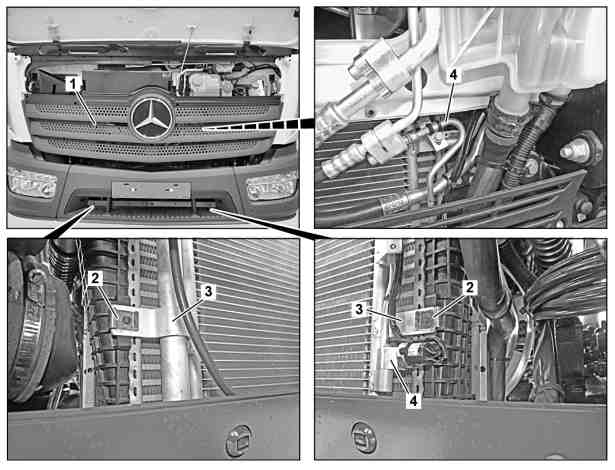
1 | Trim grille |
2 | Lower clip |
3 | Condenser |
4 | Refrigerant line |
W83.30-1270-06

W83.30-1271-08
3 | Condenser | 6 | Line bracket | 8 | Refrigerant line | ||
5 | Line bracket | 7 | Cable tie | 9 | Clamps |
Danger ! | Risk of injury caused by body parts being pinched or crushed as cab is tilted | Ensure that no one is within the tilting range of the cab as it is being tilted. Always tilt the cab all the way to the end position and secure with the safety strut. | |
Danger ! | Risk of explosion caused by welding or soldering work on closed air conditioning system. Risk of poisoning caused by inhaling overheated refrigerant vapors. Risk of injury to skin and eyes caused by contact with liquid refrigerant. | Do not perform welding work on or near a closed air conditioning system. No smoking or open flames. Wear safety glasses and protective gloves. Work only in well ventilated areas. Carry out repair work on the air conditioning system circuit only after the system has been drained. | |
| Notes on tilting the cab | ||
| Procedure for a damaged or leaky air conditioning system | ||
| Protect air conditioning circuit and components from moisture when carrying out repair work | ||
| Notes on handling refrigerant R134a | ||
| Remove/install | ||
1 | Drain air conditioning system | ||
2 | Remove trim grille (1) | ||
3 | Unclip lower clips (2) at condenser (3) | ||
4 | Remove refrigerant line (4) at condenser (3) | ||
5 | Remove refrigerant line (4) at bracket | Installation: Replace sealing rings and coat with compressor oil. | |
Nut, refrigerant line to cab | |||
6 | Tilt cab | ||
7 | Remove line bracket (5) at radiator | ||
8 | Unhook line bracket (6) from linkage and place to one side | ||
9 | Remove cable tie (7) at the refrigerant line (8) | ||
10 | Remove clamps (9) at the refrigerant line (8) | ||
11 | Remove refrigerant line (8) at the connecting point on the refrigerant compressor | Seal off line connections with suitable stop plugs. | |
Installation: Replace sealing ring and coat with compressor oil. | |||
Refrigerant line separating point | |||
12 | Unclip clips at top of condenser (3) | ||
13 | Remove condenser (3) with refrigerant line (8) upwards | Helper required. | |
Oil filling quantity of refrigerant circuit must be topped up when condenser (3) is replaced. | |||
Additional oil filling quantity after replacing condenser | |||
14 | Remove refrigerant line (8) at condenser (3) | When replacing the condenser (3). | |
Installation: Replace sealing ring and coat with compressor oil. | |||
Refrigerant line separating point | |||
15 | Install in the reverse order |
Henviste dokumenter
- ah6080n000301a Oplysninger om tipning af førerhus
- ah8330n000301a Oplysninger om håndtering af kølemidlet R134a
- ah8330n000401a Fremgangsmåde ved beskadiget eller utæt klimaanlæg
- ah8330n000501a Klimaanlæggets kredsløb og komponenter skal beskyttes mod fugt ved reparationer
- ar8330w1760na
- as6080z000101a Fare for personskade ved fastklemning og knusning, når førerhuset tippes
- as8300z000101a Fare for eksplosion ved svejse- og loddearbejde på det lukkede klimaanlæg. Fare for forgiftning ved indånding af overophedet kølemiddeldamp. Fare for personskade ved hud- og øjenkontakt med flydende kølemiddel