
Shown on model 222 with code 282 (Ski and snowboard bag) |
1 | Trunk floor lining |
2 | Rear center section paneling |
3 | Right paneling |
4 | Left paneling |
5 | Partition wall paneling |
6 | Through-loading feature |
7 | Bracket |
8 | Bolts |
9 | Expansion rivet |
P68.30-3706-06
P68.30-3707-09
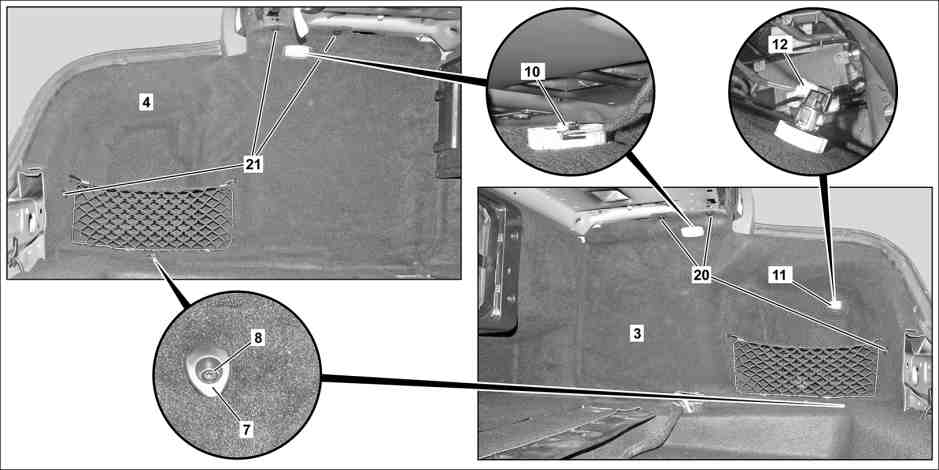
Shown on model 222 with code 282 (Ski and snowboard bag) |
3 | Right paneling | 10 | Electrical connector | |
4 | Left paneling | 12 | Electrical connector | |
7 | Bracket | 20 | Expansion rivet | |
8 | Bolts | 21 | Expansion rivet |

Shown on model 222 with code 282 (Ski and snowboard bag) |
5 | Partition wall paneling |
6 | Through-loading feature |
13 | Bolts |
14 | Expansion rivet |
P68.30-3708-05

Shown on model 222 (with CODE ME05 (HYBRID DRIVE 80KW-VARIANT (INCLUDING PLUG-IN))) |
15 | Load compartment well |
16 | Expansion rivet |
17 | High voltage battery module paneling |
18 | Bolts |
19 | Bracket |
P68.30-3786-06

P68.30-4021-09
Shown on model 222 with code (550) (Trailer hitch) |
22 | Clips | S143/3 | Trailer hitch switch | |
23 | Bracket |
Warning | Risk of injury. Moving parts can pinch, crush or, in extreme cases even sever extremities. | No parts of the body or limbs should be within the operating area of mechanical components when moving components. | |
Danger | Risk of death when working on component parts and systems with U >= 30 V alternating voltage (AC) or U >= 60 V direct voltage (DC) | Do not touch damaged or defective live component parts and lines or non-insulated electrical connections and lines. | |
Topical note | General information on handling vehicles with high-voltage on-board electrical system and/or lithium-ion battery and/or gaseous-fuel drive system | ||
Topical note | Information on preventing damage to electronic components due to electrostatic discharge | ||
Notes on HANDS-FREE ACCESS | |||
| Remove/install | ||
1 | Open trunk lid | ||
2 | Remove refrigeration compartment in trunk | Model 222 | |
3.1 | Remove screws (8) from brackets (7) | Model 222.0/9, 222.1 (except 222.163) | |
3.2 | Remove screws (18) from brackets (19) | Model 222.163/173 | |
4 | Remove trunk floor lining (1) | ||
5 | Remove expansion rivets (16) | ||
6 | Remove toolbox from load compartment well (15) | ||
7 | Remove load compartment well (15) | ||
8 | Remove expansion rivets (9) | ||
9 | Unclip rear center section paneling (2) upward | ||
10.1 | Remove expansion rivet (14) from partition wall panel (5) | Model 222 | |
10.2 | Remove screws (13) and remove through-loading feature (6) | Model 222 | |
11 | Remove partition wall panel (5) | ||
12 | Remove expansion rivet (21) from left paneling (4) | ||
13 | Loosen left paneling (4) | ||
14 | Disconnect electrical connection (10) | ||
15 | Remove left paneling (4) | ||
16 | Remove expansion rivet (20) from right paneling (3) | ||
17 | Unhook right paneling (3) from the clips (22) | Model 222.0/1 | |
18 | Reach behind the right paneling (3), unclip panel with the trailer hitch switch (S143/3) from the bracket (23) and press it out of the right paneling (3) | Model 222.0/1 | |
19 | Disconnect electrical connector from trailer hitch switch (S143/3) | Model 222.0/1 | |
20 | Loosen right paneling (3) | ||
21 | Disconnect Electrical connections (10) | ||
22 | Disconnect electrical connections (12) | ||
23 | Remove right paneling (3) | ||
24 | Remove high voltage battery module paneling (17) | Model 222.163/173 | |
25 | Install in the reverse order |
Henviste dokumenter
- ah0000z030001a Generelle oplysninger ved køretøjer med højvoltsnet og/eller litium-ion-batteri og/eller gasdrivsystem samt personligt beskyttelsesudstyr
- ah5400p000101a Oplysninger med henblik på at undgå skader på elektroniske komponenter på grund af elektrostatisk afladning
- ah8061p000101a Oplysninger om HANDS-FREE ACCESS
- as0000z000901a Fare for personskade som følge af klemning af legemsdele, i værste fald fare forafskæring af legemsdele ved indgreb i mekanikken
- as0000z003501a Livsfare ved arbejde på komponenter og systemer med U >= 30 V vekselspænding (AC) eller U >= 60 V jævnspænding (DC)