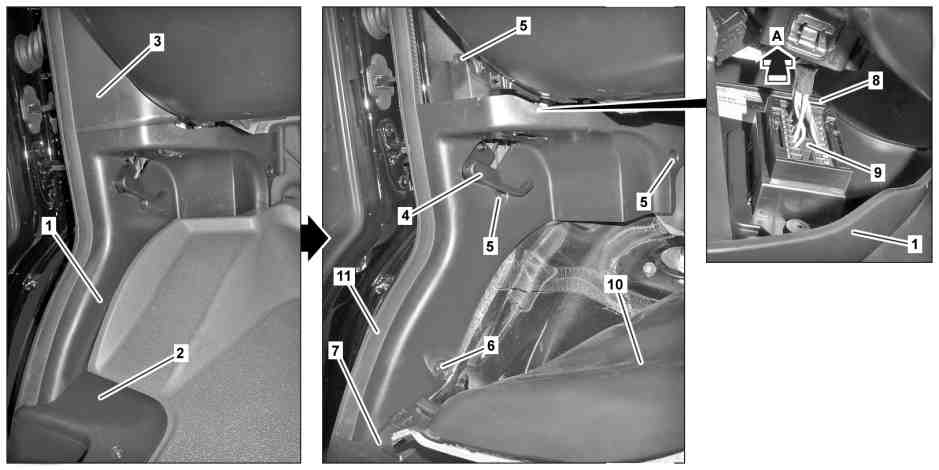
D68.30-2500-09
1 | Lower A-pillar trim | 7 | Entrance paneling | |
2 | Door sill | 8 | Locking element | |
3 | Cover | 9 | Diagnostic connector | |
4 | Engine hood cable handle | 10 | Floor covering | |
5 | Expansion rivet | 11 | Frame seal | |
6 | Screw |
Topical note | Notes on carrying out repair work in the vehicle interior | ||
| Remove/install | ||
1 | Remove door sill molding (2) | ||
2 | Unclip engine hood cable handle (4) using a suitable screwdriver, and remove | ||
3 | Remove panel (3) | ||
4 | Fold back floor covering (10) and unscrew screw/bolt (6) | ||
5 | Remove expansion rivet (5) | ||
6 | Slide on locking element (8) in direction of arrow (arrow A) and pull the diagnostic connector (9) upwards out of the A-pillar trim at the bottom (1) | ||
7 | Lift door sill trim (7) in the front area slightly and remove A-pillar trim at bottom (1) | Installation: Ensure that sealing frame (11) is seated correctly. | |
8 | Remove bracket of diagnostic connector (9) | When replacing A-pillar trim at bottom (1). | |
9 | Install in the reverse order |
Henviste dokumenter
- ah6800n000101s Oplysninger om udførelse af reparationsarbejde i kabinen
- ar6830d1306ts
- ar8310d4719ts