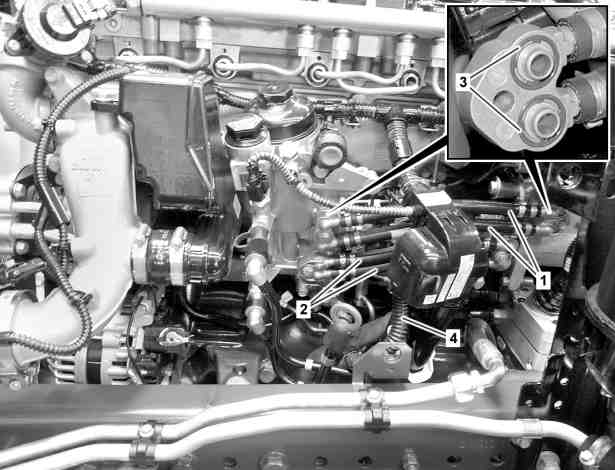
1 | Fuel lines |
2 | Fuel lines |
3 | Sealing rings |
4 | Electric wiring harness |
W49.20-1056-06

4 | Electric wiring harness |
5 | Fuel tubes |
6 | Diesel dosing device |
7 | Fuel tubes |
8 | Fuel line |
9 | Electric connections |
10 | Bolts |
W49.20-1031-06
Danger | Risk of explosion caused by fuel igniting, risk of poisoning caused by inhaling and swallowing fuel as well as risk of injury to eyes and skin caused by contactwith fuel. | No fires, sparks, open flames or smoking. Pour fuels into suitable and appropriately marked containers only. | |
Warning | Risk of accident from vehicle starting off by itself when engine running. Risk of injury (bruises and burns) resulting from working on the engine while it is being started or when it is running. | Secure vehicle to prevent it from starting off by itself. Wear closed and snug-fitting work clothes. Do not touch hot or rotating parts. | |
Topical note | Notes on avoiding damage through contamination and foreign objects | ||
Topical note | Notes on self-locking nuts and bolts | ||
Topical note | Notes on battery | ||
| Remove/install | ||
1 | Open the engine compartment | The access to perform maintenance and repair works varies according to the type / body manufacturer. | |
2 | Clean the engine at the Diesel dosing area (6) | ||
3 | Remove the engine management control unit (MCM) | ||
4 | Remove the fuel lines (1, 2) | Installation: replace the sealing rings (3). | |
Low pressure fuel lines flange on fuel high pressure pump | |||
Low pressure fuel line flange on fuel filter module | |||
5 | Fasten the wiring harness (4) sideways | ||
6 | Remove the fuel line (5) at the Diesel dosing device (6) and loosen it at the fuel filter module | Installation: Replace sealing rings. | |
Fuel return line connection of the doser | |||
7 | Remove the fuel piping (7) at the Diesel dosing device (6) | Hollow screw of the doser fuel feed line | |
8 | Remove the fuel line (8) | Installation: Replace sealing rings. | |
Fuel return line connection of the doser | |||
9 | Separate the electrical connections (9) at the Diesel dosing device (6) | ||
10 | Remove the screws (10) | Screw of diesel fuel doser on holder | |
11 | Remove the Diesel dosing device (6) | ||
12 | Install in reverse order | ||
13 | Carry out the purging routine with the diagnosis device | ||
The procedure is completely menu-guided. |
Henviste dokumenter
- ah0000n000101a Oplysninger om selvlåsende bolte og møtrikker
- ah0000n500001h Oplysninger om forebyggelse af skader på grund af snavs og fremmedlegemer
- ah5410p000101a Oplysninger om batterier
- ah5410p000101a
- ar0708b7013evi
- ar4920b1051evi
- as0000z000501a Fare for ulykke ved automatisk igangsætning når motoren kører. Fare for personskade på grund af knusning og forbrænding, hvis der arbejdes mens motoren startes eller kører
- as4700z000101a Fare for eksplosion ved tænding, fare for forgiftning ved indånding og indtagelse af brændstof samt fare for hud- og øjenskader ved kontakt med brændstof