30-1010 Adjusting Accelerator Control Linkage
Preceding work: | Operation no. of operation texts and work units or standard texts and flat rates: 30-1010 |
B. Engine 603.96 in Model 124

Accelerator control linkage | examine for bending and ease of movement. |
Idle stop | check, adjust. The spring plate (226) of the Bowden cable (230) must be resting against the compression spring (227) free of tension in the idle position; adjust Bowden cable, if necessary, with the adjusting nut (232) from interior of car. |
Return springs (25 and 235) | check. |
Relay lever (214) | move into idle position; this must cause the roller (215) to move against the end stop in the variable-fulcrum lever free of tension. |
Accelerator control lever (208) | pull to full load; this must cause the injection pump control lever to move against the full load stop and the roller (215) to rest approx. 1 mm before the end stop in the gate. If not, slide adjustable ball head (206) in elongated hole (Number 3). |
Cruise control (Tempomat) | adjust: detach connecting rod (201) at actuator, move lever of actuator into idle position. |
Connecting rod (201) | adjust so that it is 0.5-1.0 mm shorter than the actual max. distance. Attach connecting rod. |
Control thrust cable (211) | adjust. Detach ball socket (212). Push control thrust cable (211) forward until a slight resistance is felt. In this position, attach ball socket free of tension; adjust at Bowden cable, if necessary. |
Full throttle stop | check, adjust. With engine switched off, depress accelerator pedal fully to the kickdown switch from the passenger compartment. This must cause the control lever of the injection pump to move against the full load stop; adjust at adjusting screw (229), if necessary. The spring plate (226) must be resting against the compression spring (227) free of tension in idle position. Adjust Bowden cable (230), if necessary, with the adjusting nut (232) from interior of car. |
Connecting rod (203) | cannot be adjusted. |
Note
Use anti-corrosion grease
Part No. 000 989 87 51 10 when performing assembly work on the accelerator control.
Lengths of connecting rods in mm
Item 201 Cruise control connecting rod | 1011 |
Item 203 Accelerator control lever connecting rod | 1201 |
Item 204 Injection pump connecting rod | 1541 |

1 Examine accelerator control linkage for bending and ease of movement.
2 Check idle stop, adjust. The spring plate (226) of the Bowden cable (230) must be resting free of tension against the compression spring (227).

Adjust Bowden cable (230), if necessary, with the adjusting nut (232) from the interior of the car.

3 Move relay lever (214) into idle position; this must cause the roller (215) to move free of tension against the end stop in the variable-fulcrum lever.

Adjust connecting rod (204), at the adjustable ball head (206), if necessary.
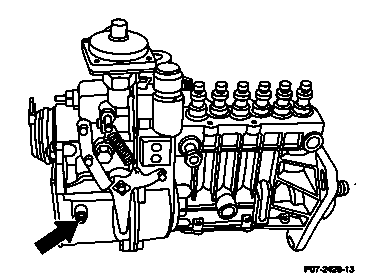
4 Pull accelerator control lever (208) to full load; this must cause the roller (215) to be positioned approx. 1 mm before the end stop in the gate and the injection pump control lever to move against the full load stop (arrow).
Slide the adjustable ball head (206) in the elongated hole of the relay lever (214), if necessary.

5 Set cruise control. Detach connecting rod (201) at the actuator.
Move lever of actuator into idle position.
Adjust connecting rod (201) so that it is
0.5 mm shorter or set one turn shorter.
Attach connecting rod.

6 Adjust control thrust cable. Press off ball socket (212) for this step. Pull control cable forward until a slight resistance is felt. In this position, attach ball socket free of tension. Adjust Bowden cable (211), if necessary.
7 Check full throttle stop, adjust. With the engine switched off, depress accelerator pedal fully to the stop on the kickdown switch from the interior of the car. This must cause the control lever (arrow) to move against the full load stop of the injection pump.
Adjust at the adjusting screw (229), if necessary.
Note
The spring plate (226) of the Bowden cable must be resting free of tension against the compression spring (227) in the idle position. Adjust Bowden cable (230), if necessary, with the adjusting nut (232) from the interior of the car.