
P67.10-2036-06
1 Windshield
2 Heated window connector
Modification notes
| Removing | ||
Danger! | Risk of injury due to tear or warming up of cutting wire and through glass splinters when cutting out glued windows | Wear protective gloves and safety glasses. | |
Danger! | Risk of injury caused by moving parts that can pinch, crush or, in extreme cases even sever extremities. | Always remove ignition key when working on windshield wiper mechanism. | |
1 | Prepare 1-component adhesive cartridge | ||
Intermediate piece | |||
Cartridge preheater, cartridge gun gotis://K_67.0_02.0 | |||
Repair kit | |||
2 | Remove rain sensor (B38) | ||
3 | Remove automatic light switch daylight sensor (B32/1) | ||
4 | Remove wiper arms | ||
5 | Remove water deflector over wiper system | ||
6 | Disconnect electrical connector for heated window (2) | ||
7 | Remove ornamental frame on windshield. | ||
8 | Cut out windshield (1) with Roll Out 2004 window removal tool | Roll out 2004 window removal tool gotis://K_67.0_01.0 | |
Suction lifting device gotis://K_67.0_03.0 | |||
9 | Remove windshield (1) from body with Cup suction tools | Aid of helper required. | |
Suction lifting device gotis://K_67.0_03.0 | |||
| Install | ||
10 | Prepare body flange for installation of window | ||
| General notes about painting the body flange in the glazing area | Pay attention to notes concerning the preparation of new parts such as the A-pillar, the roof or the side walls. | |
Wet and dry vacuum cleaner gotis://P_00.12_06.0 | |||
Repair kit | |||
Repair kit | |||
Touch-up pencil | |||
Hepox 2K EP primer filler 4017 (Spray Max) | |||
11 | Replace rubber window spacers | Do not remove protective foil. | |
12 | Prepare windshield (1) for glazing | ||
Repair kit | |||
13 | Align windshield (1) in the body opening | Aid of helper required. | |
Observe gap | |||
Feeler gauge | |||
Suction lifting device gotis://K_67.0_03.0 | |||
Distance between top edge of window and front edge of roof | |||
14 | Remove protective foil from rubber window spacers. | ||
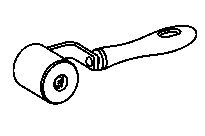
15 | Smooth sealing channel with hand roller | Roller | |
16 | Apply adhesive material | Install windshield (1) within 10 minutes before adhesive force of adhesive material starts to decrease. | |
Height of glue bead approx. 13 mm. | |||
Intermediate piece | |||
Cartridge gun gotis://K_67.0_02.0 | |||
Repair kit | |||
Repair kit | |||
17 | Install windshield (1) | Open a side window in the vehicle to prevent the windshield (1) from being pressed outward by air pressure when the door is closed | |
Aid of helper required. The waiting time (drive-away time) is approx. 1 h calculated from the time the windshield is installed. | |||
Suction lifting device gotis://K_67.0_03.0 | |||
18 | Install ornamental frame on wind deflector | ||
19 | Install water repellent over wiper system | ||
20 | Install wiper arms | ||
21 | Disconnect electric connector (2) for heated window | ||
22 | Install rain sensor | ||
23 | Install automatic light switch daylight sensor | ||
24 | Clean windshield (1) | ||
25 | Code adaptation of rain sensor and light sensor amplification factor and select type of windshield | Engine hood and driver door must be closed. | |
| Connect STAR DIAGNOSIS and read out fault memory |
Test and adjustment values for windshield
Number | Designation | Model 215 | ||
BE67.10-P-1001-01A | Distance between window upper edge and front edge of roof | Dimension "A" | mm | 12 |
See picture | ||||


129 589 03 21 00
Roller
Feeler gauge
Intermediate piece
000 589 86 63 00
168 589 05 63 00
Repair materials
Number | Designation | Order number |
BR00.45-Z-1015-02A | Repair kit, glazing, installing window, 2-component adhesive | A 220 670 00 93 |
BR00.45-Z-1089-02A | Repair kit, installing window, 1-component adhesive, replaced by: A 221 670 81 01 | A 221 670 21 01 |
BR00.45-Z-1012-07A | Primer stick | A 000 986 27 50 |
BR00.45-Z-1050-07A | Hepox 2K EP primer filler 4017 (Spray Max) | Spies Hecker GmbH |
Odkazované dokumenty
- ad0000p200004a
- ad0000p200004a Připojení STAR DIAGNOSIS, načtení chybové paměti
- ah9800p940806a Všeobecná upozornění pro lakování přírub karoserie v okolí skel
- ar6710p100002n
- ar6710p100003n
- ar6710p100004k Vyrovnání čelního okna v otvoru karoserie
- ar6710p100008p Nanést lepicí materiál
- ar6710p100011sx Vyřezávání skel pomocí sady Roll Out
- ar6710p100012sx Připravit kartuši s 1složkovým lepidlem
- ar6710p1200m
- ar6710p150101p Příprava příruby karoserie k zasklení
- ar6710p150301k
- ar8210p2400i
- ar8230p6100m
- ar8230p7700m
- ar8325p1406m
- as6700z000401a Nebezpečí poranění při přetržení, resp. zahřátí řezacího drátu a skleněnými střepy při vyřezávání lepených skel
- as8230z000101a Nebezpečí poranění přivřením nebo přiskřípnutím, v extrémním případě amputace končetin při zásazích do mechaniky stěračů