
Shown on transmission 725.0 (except 725.037) |
1 | Screw |
2 | Screw |
3 | Screw |
4 | Screw |
5 | Screw |
6 | Screw |
7 | Screw |
8 | Screw |
9 | Screw |
10 | Screw |
29 | Swirl pipe for ultrasound measurement |
30 | Screw plug |
31 | Overflow pipe |
32 | Oil filter |
33 | Seal |
34 | Oil pan |
35 | Transmission |
P27.10-2680-06

Shown on transmission 725.0 (except 725.037) |
Pos. 4 | Drain large oil filling capacities position |
P27.00-2450-11

Shown on transmission 725.037 |
1 | Screw |
2 | Screw |
3 | Screw |
4 | Screw |
5 | Screw |
6 | Screw |
7 | Screw |
8 | Screw |
9 | Screw |
10 | Screw |
29 | Swirl pipe for ultrasound measurement |
30 | Screw plug |
31 | Overflow pipe |
32 | Oil filter |
33 | Seal |
34 | Oil pan |
35 | Transmission |
P27.10-A039-06
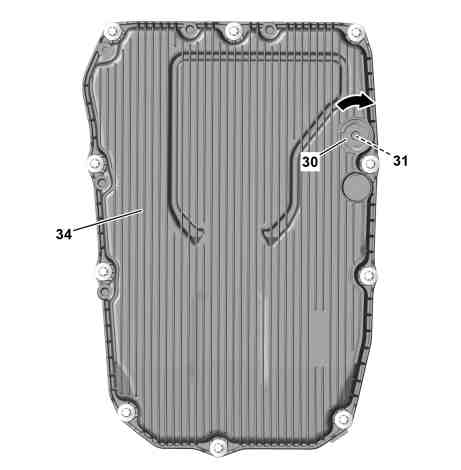
Shown on transmission 725.037 |
30 | Screw plug |
31 | Overflow pipe |
34 | Oil pan |
P27.00-A007-12

35 | Transmission |
36 | Engine mount |
37 | Nuts |
38 | Crossmember |
P22.10-A058-11
Danger | Risk of death caused by vehicle slipping or toppling off of the lifting platform. | Align vehicle between vehicle lift columns and position the four support plates at the vehicle lift support points specified by the vehicle manufacturer. | |
Warning | Risk of injury. Moving parts can pinch, crush or, in extreme cases even sever extremities. | No parts of the body or limbs should be within the operating area of mechanical components when moving components. | |
Warning | Risk of injury. Skin or eye injuries may result when handling hot or glowing objects. | Wear protective gloves, protective clothing and safety glasses, if necessary. | |
Caution | Risk of injury to skin and eyes due to handling of transmission oil. Health risk caused by swallowing transmission oil | Wear protective gloves, protective clothing and safety glasses. | |
Caution | Risk of injury caused by scraping or cutting body parts on sharp vehicle parts | Always wear protective gloves when working on or near sharp and non-deburred vehicle parts. | |
Topical note | Notes on bolted connections with self tapping screws | ||
Topical note | Notes on self-locking nuts and bolts | ||
Topical note | Notes on threaded connections fastened using a tightening angle-based tightening process | ||
Notes on automatic transmission | |||
| Remove | ||
1 | Remove center and rear lower engine compartment lining. | ||
2 | Thoroughly clean oil pan (34) and surrounding area. | Assembly cleaner | |
3 | Remove screw plug (30). | Position oil receptacle under oil pan (34). | |
Commercially available devices/tools | |||
Open screw plug (30) using socket wrench. | |||
Socket wrench | |||
4.1 | Set overflow pipe (31) to "drain large oil filling capacities" position (Pos. 4) using socket wrench and drain transmission oil. | Transmission 725.0 (except 725.037) in model 167 | |
Socket wrench | |||
4.2 | Rotate overflow pipe (31) using Allen wrench, size 10, in direction of arrow up to end stop, remove from base and drain transmission oil. | Transmission 725.037 in model 167 | |
Commercially available devices/tools | |||
5 | Remove heat shield from oil pan (34). | ||
6 | Remove holders that are installed on the oil pan (34). | If holders are present. | |
The number of holders may vary depending on the equipment variant. | |||
7 | Remove nuts (37) of engine mount (36) from crossmember (38) and lift transmission (35). | Transmission 725.0 in model 167 | |
| 000 588 10 62 00 Support plate | ||
| 000 588 11 62 00 Major assembly mount | ||
8 | Unscrew screws (1 to 10). | Commercially available devices/tools | |
9 | Lower transmission (35) until engine mount (36) makes contact with crossmember (38). | Transmission 725.0 in model 167 | |
| 000 588 10 62 00 Support plate | ||
| 000 588 11 62 00 Major assembly mount | ||
10 | Remove oil pan (34) from transmission(35). | ||
11 | Take overflow pipe (31) and swirl pipe for ultrasound measurement (29) out of oil pan (34). | ||
12 | Remove seal (33). | Only when reusing the oil pan (34). | |
| Clean | ||
13 | Clean sealing surfaces of oil pan (34) and magnets. | Only when reusing the oil pan(34). | |
| |||
Let assembly cleaner flash off completely. | |||
Assembly cleaner | |||
14 | Clean sealing surface at transmission (35). | | |
Let assembly cleaner flash off completely. | |||
Assembly cleaner | |||
| Install | ||
15 | Attach seal (33). | | |
Replace seal (33). | |||
16.1 | Replace overflow pipe (31) and swirl pipe for ultrasound measurement (29) of oil pan (34). | When installing new oil pan (34). | |
Transmission 725.0 (except 725.037) in model 167 | |||
Transmission 725.037 in model 167 | |||
16.2 | Check overflow pipe (31) and swirl pipe for ultrasound measurement (29) for firm seating on base and for signs of damage. | If oil pan (34) is to be reused. | |
If problems occur, | |||
| |||
replace overflow pipe (31) and swirl pipe for ultrasound measurement (29). | |||
Transmission 725.0 (except 725.037) in model 167 | |||
Transmission 725.037 in model 167 | |||
17 | Attach oil pan (34) to transmission (35) and partially screw-in screws (1-8). | ||
Notes on oil pan versions | Transmission 725.0 (except 725.037) in model 167 | ||
| |||
Replace screws (1-8). | |||
Replace oil pan (34) when replacing oil filter (32). | |||
18 | Lift up transmission (35). | Transmission 725.0 in model 167 | |
| 000 588 10 62 00 Support plate | ||
| 000 588 11 62 00 Major assembly mount | ||
19 | Partially screw-in screws (9, 10). | Replace bolts (9, 10). | |
20 | Tighten screws (1 to 10). | Tighten screws (1 to 10) of oil pan (34) in numerical sequence. | |
Commercially available devices/tools | |||
Screw/bolt, oil pan to transmission housing | |||
21 | Lower transmission (35). | Transmission 725.0 in model 167 | |
| 000 588 10 62 00 Support plate | ||
| 000 588 11 62 00 Major assembly mount | ||
22 | Attach nuts (37) of engine mount (36) to crossmember (38). | Transmission 725.0 in model 167 | |
| 000 588 10 62 00 Support plate | ||
| 000 588 11 62 00 Major assembly mount | ||
Bolt/nut, rear engine mount to rear engine crossmember | |||
23 | Attach holders to oil pan (34). | If holders were present. | |
The number of holders may vary depending on the equipment variant. | |||
M61 | |||
24 | Attach heat shield to oil pan (34). | ||
Screw/bolt, heat shield to oil pan | |||
25 | Fill transmission(35) with oil. |
| |
Transmission 725.037 in model 167 | |||
| |||
26 | Install center and rear lower engine compartment lining. |


724 589 01 09 00
Socket wrench
725 589 00 09 00
Socket wrench