
P72.12-2528-08
Shown with code (889) Keyless go, left rear door
1 Door foil
2 Retaining plate
3 Sidebag unit in rear
4 Multipoint connector
5 Butyl cord
N69/8 Left rear door Keyless go control unit (with code (889) Keyless go)
N69/9 Right rear door Keyless go control unit (with code (889) Keyless go)
6 Inner door panel
7 Bowden cable
N69/3 Left rear door control unit
N69/4 Right rear door control unit
| Remove | ||
1 | Remove left rear door control unit N69/3) or right rear door control unit (N69/4) | ||
2.1 | Remove left rear door Keyless go control unit (N69/8) or right rear door Keyless go control unit (N69/9) | On vehicles with code (889) Keyless go | |
3 | Unlock retaining plate (2) with suitable screwdriver (arrow) and remove | ||
4 | Disconnect electrical connector from sidebag in rear (3) | ||
| Instructions for performing repair, body work and welding on vehicles with airbags and ETR units | ||
5 | Disconnect electrical connectors at the multipoint connector (4) | ||
6 | Loosen butyl cord (5) on rear of door foil (1) from inner door panel (6) with suitable cutting blade or cut | Carefully loosen butyl cord (5) from inner door panel (6)Danger of corrosion damage if paint on inner door panel (6) is damaged | |
It is only necessary to partially loosen the door foil (1) from the inner door panel (6) to reach components covered by it | |||
7 | Guide Bowden cable (7) and electrical lines through door foil (1) and remove door foil (1) | ||
| Install | ||
8 | Check door foil (1) for damage, replace if necessary | When replacing door foil (1) remove butyl cord (5) residues from inner door panel (6) and clean gluing surfaces. | |
Cleaner | |||
9 | Check butyl cord (5) for damage, replace if necessary | If butyl cord is partially damaged (5) replace only damaged section of butyl cord (5). Route new butyl cord (5) parallel to damaged butyl cord (5) on door foil (1)Remove butyl cord (5) residues from inner door panel (6) and clean gluing areas | |
Sealing cord | |||
Cleaner | |||
10 | Move Bowden cable (7) and electrical lines through corresponding openings in door foil (1) | ||
11 | Place door foil (1) on the inner door panel (6) and roll on | Observe installation position of door foil (1) on inner door panel (6). | |
| |||
12 | Connect electrical connector (3) to sidebag | Ensure that electrical connector (3) is seated correctly | |
| Instructions for performing repair, body work and welding on vehicles with airbags and ETR units | ||
13 | Remove retaining plate (2) | Ensure that retaining plate (2) is seated correctly on inner door panel (6) | |
14 | Connect electrical connectors to multipoint connector (4) | ||
15.1 | Install left rear door Keyless go control unit (N69/8) or right rear door Keyless go control unit (N69/9) | On vehicles with code (889) Keyless go | |
16 | Install left rear door control unit N69/3) or right rear door control unit (N69/4) |
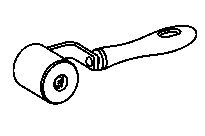
Roller
168 589 05 63 00
Repair materials
Number | Designation | Order number |
BR00.45-Z-1086-01A | Soft top frame sealing profile with metal core 35 m, SEALANT/butyl Bostik 1127 | A 005 989 12 71 10 |
BR00.45-Z-1025-04A | Cleaner | A 005 989 19 71 |
Documentos referenciados
- ah9100p000201m Indicações para execução de trabalhos de reparos, na carroçaria e solda em veículos equipados com unidades de Airbag ou dos prétensionadores de cintos
- ar7229p1100tx
- ar8035p0001tx