
P77.50-2226-09
1 Seal
2 Expansion clips
11 Roller
3 A-pillar
10 Roller

P77.50-2227-09
3 A-pillar
4 Windshield crossmember
5 Sealing profile dia. 4 mm
6 dia. 6 mm sealing profile
12 Backing
A Clearance
7 Sealing profile dia. 4 mm
8 Pull-in nut
9 Retaining rail

P77.50-2228-07
1 Seal
13 Shaped part
9 Retaining rail
| Removing | ||
1 | Remove outer paneling on left and right A-pillar (3) | ||
2 | Remove expansion clip (2) from left and right A-pillar (3) | Clip remover | |
3 | Remove seal (1) from windshield crossmember (4) and A-pillars (3) | ||
| Clean | ||
4 | Remove sealant residues and clean sealing surfaces on windshield crossmember (4) and A-pillars (3) | The sealing surfaces must be free of oil and grease. Otherwise leakage is not possible | |
Observe drying time for cleaning agent It is not necessary to clean the seal (1) because it is always replaced after removal | |||
Cleaner | |||
| Install | ||
5 | Lay Ø 4 mm sealing profiles (7) in center on windshield crossmember (4) | Do not touch Ø 4 mm sealing profile (7) with bare fingers. approx. 550 mm. The Ø 4 mm sealing profiles (7) should overlap clearly (arrow C) in the center of the windshield crossmember (4). | |
Sealing profile | |||
6 | Lay Ø 4 mm sealing profile (5) at both A-pillars (3) and windshield crossmember (4) starting at the upper end of the retaining rail (9) | Do not touch Ø 4 mm sealing profile (5) with bare fingers. Route Ø 4 mm sealing profile (5) below hole (arrow E). | |
Sealing profile | |||
7 | Lay Ø 6 mm sealing profile (6) at upper corner on left and right A-pillar (3) | Ø 6 mm sealing profile (6) should overlap clearly with Ø 4 mm sealing profile (7) and Ø 4 mm sealing profile (5). Otherwise leakage can occur later | |
Do not touch dia. 6 mm sealing profile (6) with bare fingers Route Ø 6 mm sealing profile (6) below pin-in nuts (8). | |||
Butyl cord | |||
8 | Position seal (1) on windshield crossmember (4) with both corner elements (arrows B), align corner elements (arrows B) on pull-in nuts (8) and press seal (1) to windshield crossmember (4) toward center. | Use new seal (1) | |
9 | Align seal (1) on left and right retaining rail (9) and position | The seal (1) must be positioned on the cutout (arrow) on the left and right retaining rail (9) as shown. | |
10 | Press seal (1) to A-pillars (3) and windshield crossmember (4) over entire length with roller (10) | Carefully roll on seal (1). Otherwise, the seal can be damaged if pressed too firmly. | |
Press seal (1) down in routing area of sealing cords (5, 6, 7). | |||
Roller | |||
11 | Cut ends of Ø 4 mm sealing profile (5) extending beyond both A-pillars (3) flush with seal (1) using a clip remover and remove | Clip remover | |
12 | Press seal (1) on with roller (11) in crosshatched areas. | Roller | |
13 | Install expansion clips (2) | ||
14 | Install paneling on left and right outer A-pillar (3) | ||
15 | Clean seal (1) and adjacent body parts | While cleaning check whether seal (1) is seated correctly | |
Cleaner | |||
| Checking | ||
16 | Visual check | Check contact on roof frame. | |
17 | Perform rain test |

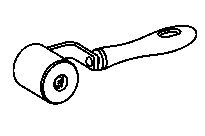

171 589 06 63 00
Clip remover
Roller
Roller
168 589 05 63 00
452 589 01 63 00
Repair materials
Number | Designation | Order number |
BR00.45-Z-1084-01A | Rear window sealing profile | A 004 989 60 20 |
BR00.45-Z-1085-01A | Butyl cord Terostat 81 Ø 6 mm | A 004 989 61 20 |
BR00.45-Z-1025-04A | Cleaner | A 005 989 19 71 |