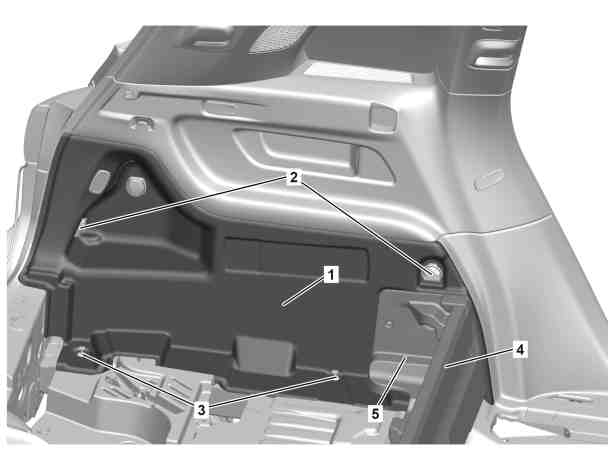
Shown on model 247.6 without code 847 (third row of seats) |
1 | Cover |
2 | Tie-down eyes |
3 | Expansion rivet |
4 | Strut |
5 | Front mounting support |
P68.30-A030-06
Warning | Risk of injury caused by fingers being jammed or pinched when removing, installing or aligning hoods, doors, trunk lid/rear-end door or sliding roof. | No parts of the body or limbs should be within the operating area when the components are moving. | |
Topical note | Information on preventing damage to electronic components due to electrostatic discharge | ||
Notes on HANDS-FREE ACCESS | |||
| Remove/install | ||
1 | Remove corresponding rear seat of the third row of seats. | Model 247.6 | |
2 | Remove rear-end center-section trim. | ||
3 | Remove tie-down eyes (2). | Screw/bolt for tie-down eye | |
4 | Remove expansion rivets (3). | Dismantling tool | |
5 | Remove cover of the rear mounting support and remove the nuts underneath. | Model 247.6 | |
6 | Fold back rear seat. | ||
7 | Remove strut (4). | Model 247.6 | |
8 | Release front mounting support (5) until the trim (1) can be removed. | Model 247.6 | |
9 | Release trim (1) until the electrical connectors are accessible. | | |
10 | Release and disconnect electrical connectors. | The number of electrical connectors varies according to vehicle equipment. | |
11 | Remove trim (1). | Installation: | |
12 | Convert detachable parts. | When replacing trim (1). | |
13 | Install in the reverse order. | ||
14 | Position edge guard in the working area. |

000 589 95 63 00
Dismantling tool
Powiązane dokumenty
- ah5400p000101a Wskazówki dotyczące zapobiegania uszkodzeniom elementów elektronicznych na skutek rozładowania potencjału elektrostatycznego
- ah8061p000101a Wskazówki na temat HANDS-FREE ACCESS
- ar6830p4786mfv
- ar9112p0007mfx
- as0000z001101a Niebezpieczeństwo zranienia przez zakleszczenie lub zmiażdżenie palców podczas demontażu, montażu i prac regulacyjnych przy pokrywach, drzwiach i oknie dachowym.