Additional information can be found in the superordinate service document.
The safety information in the superordinate service document must be observed.
D64.10-1290-08
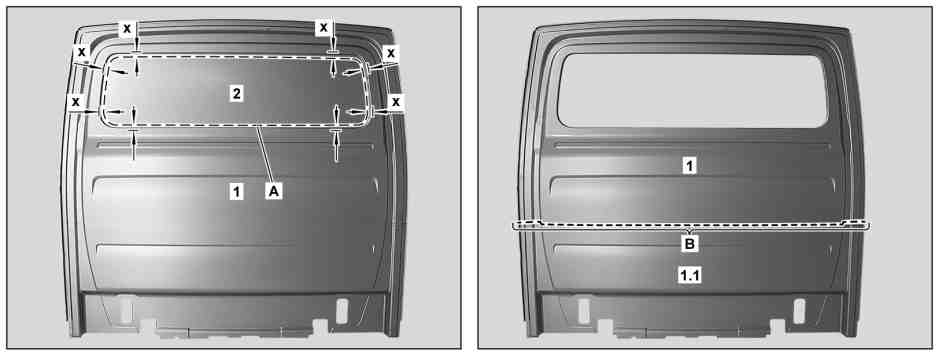
x | Dimension (13 mm) |
1 | Mark separating point as shown on the rear panel (1) (area A). |
Mark separating point next to the edge. |
2 | Cut rear panel (1) at separating point (area A). |
Commercially available devices/tools |
3 | Remove window cutout remaining piece (2). |
4 | Mark separating point as shown on rear panel (1) (area B). |
Take over dimension for separating point from vehicle. |
5 | Cut rear panel (1) at separating point (area B). |
Commercially available devices/tools |
6 | Remove rear panel remaining piece (1.1). |
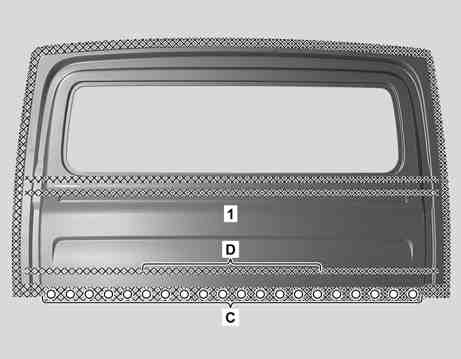
7 | Punch holes in rear panel (1) with a diameter of 6 mm (area C). |
Commercially available devices/tools |
8 | Grind mating surfaces in cross-hatched areas and around holes (area C) down to bare metal. |
Sand down spot weld flanges to bare metal on both sides. |
Commercially available devices/tools |
9 | Grind mating surfaces in cross-hatched area (area D) down to bare metal from the rear. |
Commercially available devices/tools |
10 | Remove shavings. |
Commercially available devices/tools |
11 | Zinc dust paint to insides of spot weld flanges. |
D64.10-1281-11
D64.10-1283-07
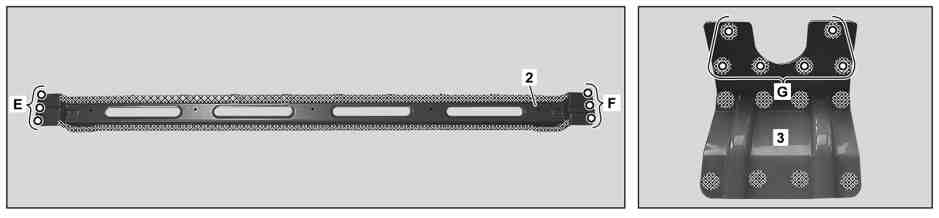
12 | Punch holes in crossmember (2) (areas E and F) and bracket (3) (area G) with a diameter of 6 mm. |
Commercially available devices/tools |
13 | Grind mating surfaces in cross-hatched areas and around holes (areas E, F and G) down to bare metal. |
Sand down spot weld flanges to bare metal on both sides. |
Commercially available devices/tools |
14 | Remove shavings. |
Commercially available devices/tools |
15 | Zinc dust paint to insides of spot weld flanges. |

16 | Attach bracket (3) and crossmember (2) to rear panel (1), fit, and fix in place. |
Commercially available devices/tools |
17 | Bracket (3) (area J). |
18 | Crossmember (2) (areas K and L). |
D64.10-1285-06