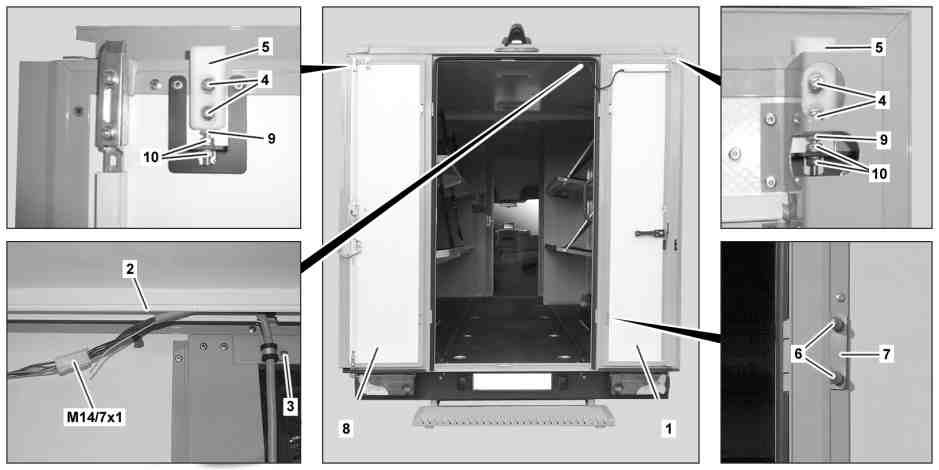
D72.20-1234-09
1 | Right rear door | 5 | Closing wedge | 9 | Adjustment screw | ||
2 | Cable duct | 6 | Nuts | 10 | Lock nuts | ||
3 | Screw | 7 | Shield | M14/7x1 | Rear-end door CL [ZV] actuator connector | ||
4 | Bolts | 8 | Left rear door |
| Remove/install | ||
Danger ! | Risk of injury caused by fingers being jammed or pinched when removing, installing or aligning hoods, doors, trunk lid/rear-end door or sliding roof. | No parts of the body or limbs should be within the operating area when the components are moving. | |
1 | Open right rear-end door (1) or left rear-end door (8) | ||
2 | Open cable duct (2) | Only right rear-end door (1). | |
3 | Disconnect connector from rear-end door CL actuator (M14/7x1) and unscrew bolt (3) | Only right rear-end door (1). | |
4 | Loosen bolts (4) | Model 906.135 up to 7/31/12 | |
5 | Detach jam nuts (10) | Model 906.135 as of 8/1/12 | |
6 | Detach adjustment screw (9) | Model 906.135 as of 8/1/12 | |
Installation: Close right rear-end door (1) or left rear-end door (8), move closing wedge (5) over adjustment screw (9) upward to stop. | |||
7 | Unscrew nuts (6) and remove shields (7) | At both door hinges on right rear-end door (1) or left rear-end door (8). | |
Installation: Secure nuts (6). | |||
Bolt/nut, hinge to rear-end door | |||
Thread locking agent, Loctite 243 (10 ml) | |||
8 | Remove right rear-end door (1) or left rear-end door (8) | | |
Helper required. | |||
Installation: Adjust right rear-end door (1) or left rear-end door (8) to equal gap all the way around and flush with each other. Ensure that stop fits. | |||
9 | Install in the reverse order |
参照文書
- as0000z001101a エンジン·フ一ド、ドア、トランスミッション·カバ一、スライディング·ル一フなどの作業の際に、手指をはさまれたり、締め付けられたりして、負傷する危険があります。