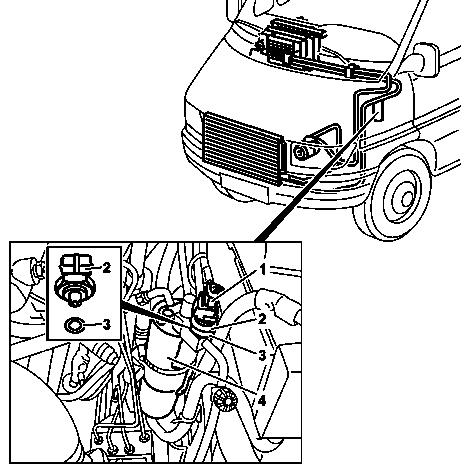
1 | Electrical connector |
2 | Pressure switch |
3 | Sealing ring |
4 | Fluid reservoir |
D83.30-1262-12
Danger ! | Risk of explosion caused by welding or soldering work on closed air conditioning system. Risk of poisoning caused by inhaling overheated refrigerant vapors. Risk of injury to skin and eyes caused by contact with liquid refrigerant. | Never perform welding work on or near a closed air conditioning system. No smoking or open flames. Wear safety glasses and protective gloves. Work only in well-ventilated areas. Carry out repair work on the air conditioning system circuit only after the system has been drained. | |
| Procedure for a damaged or leaky air conditioning system | ||
| Protect air conditioning circuit and components from moisture when carrying out repair work | ||
| Notes on handling refrigerant R134a | ||
| Remove/install | ||
1 | Disconnect electrical connector (1) and remove fluid reservoir (4) | ||
Installation: Replace fluid reservoir (4). | |||
2 | Remove pressure switch (2) from fluid reservoir (4) | Installation: Replace sealing ring (3). | |
Pressure switch | |||
3 | Install in the reverse order |
Referenced documents
- ah8330n000301a Notes on handling refrigerant R134a
- ah8330n000401a Procedure for a damaged or leaky air conditioning system
- ah8330n000501a Protect air conditioning circuit and components from moisture when carrying out repair work
- ar8330d6520f Remove/install fluid reservoir
- as8300z000101a Risk of explosion caused by welding or soldering work on closed air conditioning system. Risk of poisoning caused by inhaling overheated refrigerant vapors. Risk of injury to skin and eyes caused by contact with liquid refrigerant.