
P72.12-2667-06
Illustrated on model 251.1
1 Door frame seal
2 Window frame paneling
4 Spacer strips
| Removing | ||
Danger! | Risk of injury caused by fingers being pinched or crushed when removing, installing or aligning hoods, doors, trunk lids, liftgates or sliding roof | Keep body parts and limbs well clear of moving parts. | |
1 | Wind crank window fully down | ||
2 | Switch off ignition and remove the transmitter key from the EIS [EZS] control unit | On vehicles with Keyless Go, code 889: Press Keyless Go start/stop button repeatedly until ignition is switched off. Remove transmitter key from vehicle and store it in a location beyond its transmission range (at least 2 m). | |
3 | Loosen window frame paneling (2) from window frame and door frame seal (1) | Do not damage paint. | |
Only loosen window frame trim (2), do not completely remove it. | |||
Assembly wedge | |||
4 | Completely remove door frame seal (1) from rear door | ||
| Clean | ||
5 | Remove sealant and glue residues from rear door with eraser disc. | Dia. 100 mm removal disk with mounting shaft | |
Drill | |||
6 | Use suitable scraper to remove sealing and adhesive residue on rear door, if necessary use solvent to remove still remaining residue | At points on rear door not accessible with eraser disc | |
7 | Clean bonding surface on rear door | Bonding surface must be free of grease and dust. | |
Cleaner | |||
| Install | ||
8 | Glue door frame seal (1) onto rear door | Start at upper left corner (arrow), then glue on in one direction to the end. | |
In the upper area of the door, the spacer strip (4) must make contact with the window frame, in the lower area on the profile bend of the door skin. | |||
The adhesive line can still be corrected as long as the door frame seal (1) is not yet firmly pressed on. | |||
9 | Press on door frame seal (1) using a roller, detach spacer strip (4) | Roller | |
10 | Clip window frame trim (2) onto window frame and rubber seal | Do not damage door frame seal (1) and paintwork. | |
The edges of the window frame trim (2) must be slipped between the bonding base and the seal strip of the door frame seal (1). | |||
Assembly wedge | |||
| Checking | ||
11 | Check closing behavior of rear door by opening and closing it several times, if necessary correct adhesive line of door frame seal (1) | ||
| Install | ||
12 | Switch on ignition, close crank window | ||
| Clean | ||
13 | Remove dirt from rear door and in entrance area |
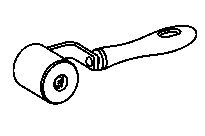

168 589 05 63 00
Roller
Mounting wedge
110 589 03 59 00
Repair materials
Number | Designation | Order number |
BR00.45-Z-1025-04A | Cleaner | A 005 989 19 71 |
Referenced documents
- as0000z001101a Risk of injury caused by fingers being jammed or pinched when removing, installing or aligning hoods, doors, trunk lid/rear-end door or sliding roof.