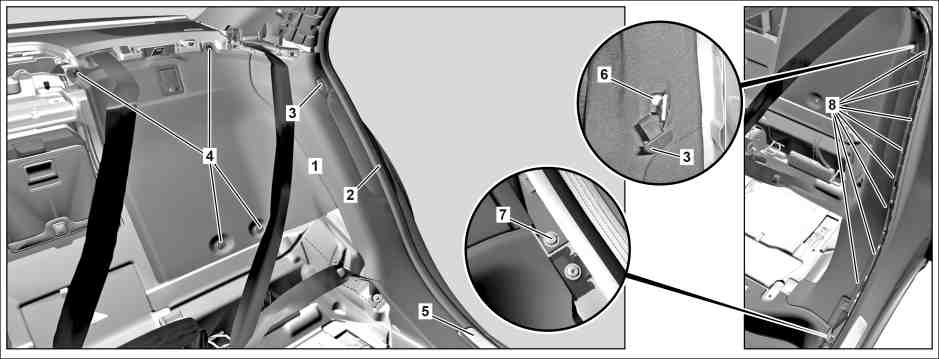
P68.30-3705-08
Shown on vehicle with CODE 223 (Electrically adjustable rear bench seat) |
1 | Side paneling | 5 | Door sill | |
2 | Edge guard | 6 | Screw | |
3 | Cover | 7 | Nut | |
4 | Expansion clip | 8 | Clips |

P68.30-3709-09
Shown on vehicle except CODE 223 (Electrically adjustable rear bench seat) |
1 | Side paneling | 6 | Screw | |
2 | Edge guard | 7 | Nut | |
3 | Cover | 8 | Clips | |
5 | Door sill |
| Remove/install | ||
1 | Remove seat cushion |
| |
MODEL 222.0/1 | |||
2 | Remove seat backrest |
| |
MODEL 222.0/1 | |||
3 | Remove armrest from backrest |
| |
4 | Remove trim piece behind rear seat |
| |
5 | Remove door sill molding (5) | ||
6 | Detach edge guard (2) in area of side paneling (1) | ||
7 | Remove cover (3) and unscrew bolt (6) | ||
8 | Remove expansion clips (4) | On vehicles with CODE 223 (Electrically adjustable rear bench seat) | |
9 | Unscrew nuts (7) | ||
10 | Unclip clips (8) on side paneling (1) from bottom upward and remove side paneling (1) | ||
11 | Install in the reverse order |
Referenced documents
- ar6830p1460lf Remove/install trim strip behind rear seat
- ar9112p1020lf Remove/install rear seat cushion
- ar9112p1020lfa Remove/install rear seat cushion
- ar9112p1620lf Remove/install rear seat backrest
- ar9112p1620lfa Remove/install rear seat backrest
- ar9112p1745lfa Remove/install armrest at rear seat backrest