AR68.30-P-4580TG | Remove/install and disassemble rear shelf | 2.11.02 |
MODEL 211.065 /070 with CODE (Z04) Light armoring
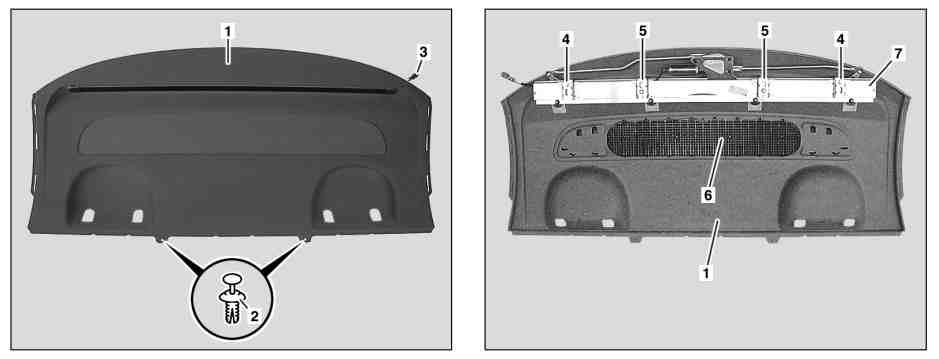
P68.30-2654-08
1 Rear shelf
2 Clip
3 Connector
6 Cover of rear loudspeaker
7 Electric scissors-type roller blind
4 Nut
5 Screw

P82.62-2416-08
8 Speaker housing
9 Electrical connector
10 Retaining clip
11 Wiring harness
H4/17x1 Bass module speaker
connector 1
H4/17x2 Bass module speaker
connector 2
H4/7 Left rear speaker
H4/8 Right rear speaker
H4/17 Bass module speaker
| Remove/Install | ||
| Instructions for avoiding damage to windows installed in special high-security vehicles. | ||
1 | Remove rear seat backrest | ||
2 | Remove rear headrests | ||
3 | Remove paneling at both C-pillars | Do not remove belt end fitting. | |
4 | Remove clips (2) | ||
5 | Unscrew nuts (4) and screws (5) | Accessible from luggage compartment. | |
6 | Lift rear shelf (1) and unclip cover of rear loud speaker (6) | ||
7 | Separate bass module speaker connector 1 (H4/17x1) and bass module speaker connector 2 (H4/17x2) at bass module speaker (H4/17) | ||
8.1 | Separate electrical connectors (9) at left rear speaker (H4/7) and right rear speaker (H4/8) | On vehicles with code (810) Sound System | |
9 | Take off retaining clips (10) and remove wiring harness (11) from speaker housing (8) | ||
10 | Twist speaker housing (8) counterclockwise until it is unlocked | ||
11 | Lift rear shelf (1), pull toward front together with speaker housing (8) and take out speaker housing (8) | Pay attention to sound deadening mat. | |
12 | Separate connector (3) and take out rear shelf (1) | ||
13.1 | Remove electric scissors-type roller blind (7) from rear shelf (1) | Only when replacing rear shelf (1) | |
14 | Install in the reverse order |
Referenced documents
- ah6700p000301fb Notes on avoiding damage to windows installed in special high-security vehicles
- ar6830p4490t Remove/install trim at C-pillar
- ar6850p4600tg Remove/install electric scissors-type roller blind for rear window
- ar9112p1620t Remove/install rear seat backrest
- ar9116p1770t Removing rear head restraint