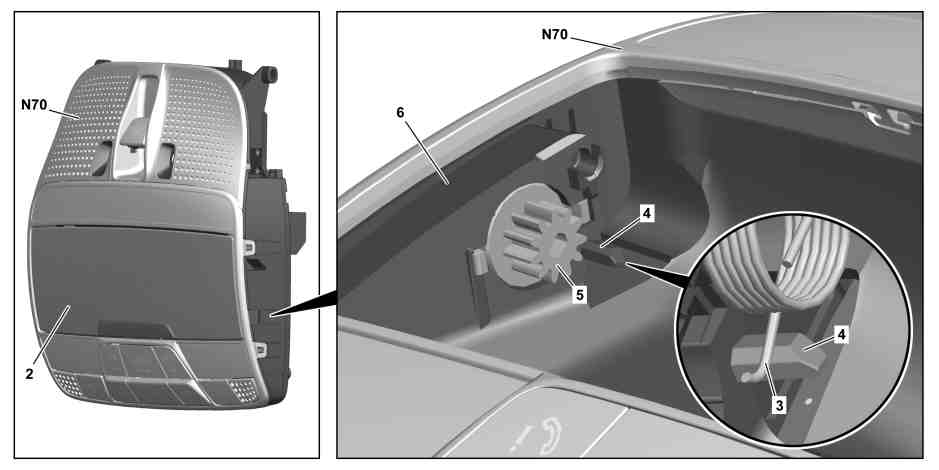
P68.30-4039-09
2 | Eyeglass compartment | 5 | Shock absorber | |
3 | Spring clip | 6 | Housing | |
4 | Retaining pin | N70 | Overhead control panel control unit |
Topical note | Information on preventing damage to electronic components due to electrostatic discharge | ||
| Remove | ||
1 | Remove overhead control panel control unit (N70). | ||
2 | Open glasses compartment (2). | ||
3 | Remove rubber mat from the glasses compartment (2). | ||
4 | Press glasses compartment (2) in the direction of the damper (5) and unclip on the opposite side from the bearing. | ||
5 | Unclip glasses compartment (2) at the side of the damper (5) from the bearing and remove. | ||
6 | Unclip damper (5) and remove from housing (6). | ||
| Check | ||
7 | Check gearwheel of the damper (5) and gearing on the glasses compartment (2) for damage and wear. | If there is a problem, | |
| |||
replace corresponding component part. | |||
8 | Check that left and right spring U-bolts (3) are seated correctly in the glasses compartment (2). | Spring clips (3) must be fully seated on spindles of glasses compartment (2). | |
If there is a problem, | |||
| |||
correct position of relevant spring clip (3). | |||
| Install | ||
9 | Insert glasses compartment (2) on the opposite side of the damper (5) in the bearing. | ||
10 | Align glasses compartment (2) vertically. | Spring clips (3) must, as shown, be seated in front of retaining pins (4). | |
11 | Slightly bend glasses compartment (2) and insert into the bearing on the side of the damper (5). | ||
12 | Insert damper (5) in housing (6) and clip in. | Do not insert damper (5) at an angle. Both engagements of damper (5) must engage almost simultaneously. | |
13 | Insert rubber mat in the glasses compartment (2). | ||
14 | Close glasses compartment (2). | ||
15 | Install overhead control panel control unit (N70). | ||
| Check | ||
16 | Check glasses compartment (2) for proper operation by opening and closing. | Perform test procedure at least three times. |
Referenced documents
- ah5400p000101a Information on preventing damage to electronic components due to electrostatic discharge
- ar8220p1000fr Remove/install overhead control panel control unit