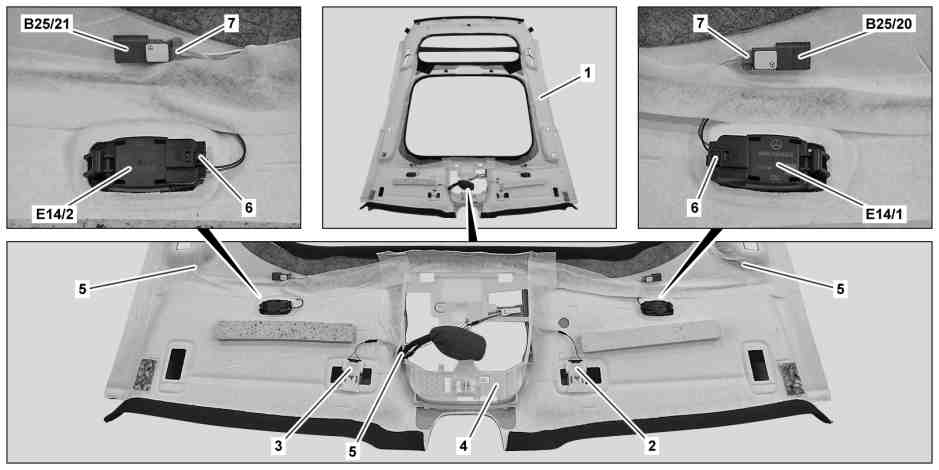
P68.30-3894-09
Shown on model 213.0 with code 413 (Panoramic sliding roof) and except code 811 (Advanced sound system) |
1 | Headliner | 7 | Electrical connector | |
2 | Left sun visor bracket | B25/20 | Driver hands-free system microphone | |
3 | Right sun visor bracket | B25/21 | Front passenger hands-free system microphone | |
4 | Frame | E14/1 | Left sun visor mirror lamp | |
5 | Electrical wiring harness | E14/2 | Right sun visor mirror lamp | |
6 | Electrical connector |
1 | Remove left sun visor bracket (2) and right sun visor bracket (3) from old headliner (1). |
The electrical connectors need not be detached. |
2 | Disconnect electrical connectors (6) and remove left sun visor mirror lamp (E14/1) and right sun visor mirror lamp (E14/2) from old headliner (1). |
3 | Disconnect electrical connectors (7) and remove driver hands-free system microphone (B25/20) and passenger hands-free system microphone (B25/21) from old headliner (1). |
4 | Unhook electrical wiring harness (5) from frame (4). |
5 | Expose electrical wiring harness (5) on old headliner (1) and remove. |
Installation: Fasten electrical wiring harness (5) with adhesive tape. |
Observe routing of lines. |

P68.30-3899-09
Shown on model 213.0 with code 811 (Advanced sound system) and except code 413 (Panoramic sliding roof) |
1 | Headliner | 11 | Electrical connectors | |
8 | Bolts | 12 | Electrical wiring harness | |
9 | Support | H4/117 | Left center rear center midrange speaker (3D sound) | |
10 | Cover molding | H4/118 | Right center rear center midrange speaker (3D sound) |
6 | Model 213.0/1 |
7 | Model 213.0/1 |
8 | Model 213.0/1 |
Installation: Fasten electrical wiring harness (12) with adhesive tape. |
Observe routing of lines. |
9 | Install detachable parts on new headliner (1) in reverse order. |
10 | Model 213.0 |
Use the same installation locations and number of soundproofing elements as for the the headliner (1). |