ar6830p1450gw
Remove/install side wall lining
Type ar · topic 68.30 · version 0101 · 2017-12-22
Applies to: Model 463 (except 463.202) as of model year 2013 up to model year 2019
Where it sits
Function group 3 Body › 68 Interior equipment › 68.30 Coverings, trim — Series 463 (models 200, 204, 206, 207, 208, 209, 210, 215, 218, 220, 221, 222, 224, 225, 227, 228, 230, 231, 232, 233, 234, 235, 236, 237, 238, 239, 240, 241, 242, 243, 244, 245, 246, 247, 248, 249, 250, 254, 255, 260, 261, 270, 271, 272, 273, 274, 275, 276, 277, 280, 300, 303, 304, 306, 307, 308, 309, 315, 318, 320, 321, 322, 323, 324, 325, 327, 328, 330, 331, 332, 333, 335, 336, 338, 340, 341, 342, 343, 346, 348, 349, 350)
EinPAS 37 Interior equipment › 37.45 Trim › 37.45.33 Side wall trim — Series 463 (models 200, 204, 206, 207, 208, 209, 210, 215, 218, 220, 221, 222, 224, 225, 227, 228, 230, 231, 232, 233, 234, 235, 236, 237, 238, 239, 240, 241, 242, 243, 244, 245, 246, 247, 248, 249, 250, 254, 255, 260, 261, 270, 271, 272, 273, 274, 275, 276, 277, 280, 300, 303, 304, 306, 307, 308, 309, 315, 318, 320, 321, 322, 323, 324, 325, 327, 328, 330, 331, 332, 333, 335, 336, 338, 340, 341, 342, 343, 346, 348, 349, 350)
AR68.30-P-1450GW
| Remove/install side wall lining
| 07.12.2017
|
Model
| 463 (except 463.202)
|
|
| as of model year 2013 up to model year 2019
|
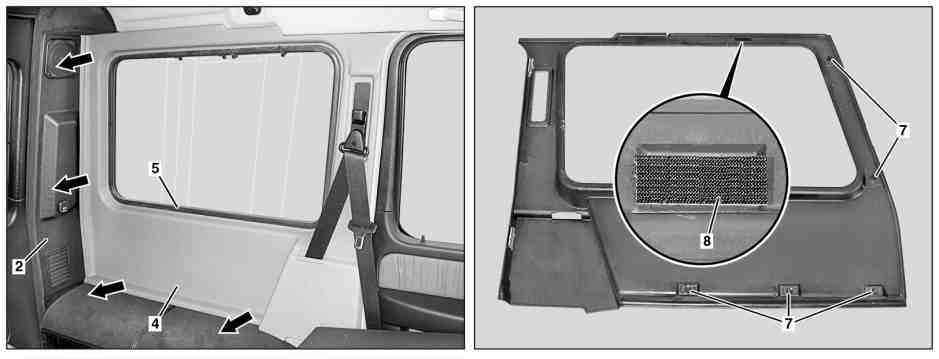
2
| Cover
|
| 5
| Window seal
|
| 8
| Velcro strip
|
4
| Side wall lining
|
| 7
| Expansion rivet
|
|
|
|
| Remove/install
|
|
|
1
| Remove the trim (2) on the D-pillar.
|
| AR68.30-P-4505GW
|
2
| Detach sealing frame of the rear door in the area of the side wall trim (4).
|
|
|
3
| Remove seat belt in the rear passenger compartment.
|
Model 463 (except 463.202/242)
as of model year 2013 up to model year 2019
| AR91.40-P-0681GW
|
|
|
| Remove only seat belt end fitting and seat belt guide bracket.
|
|
4
| Pry off the mounting clamps (6) of the side wall trim (4) from the door fold.
| Installation: Remove mounting clamps (6) from the side wall trim (4) and attach to the door fold.
|
|
5
| Remove the side wall trim (4) from the side wall at the bottom and rear (arrows).
|
The side wall trim (4) is fastened with expansion rivets (7).
Through careful removal, damage is prevented.
|
|
|
|
| Installation: Install new expansion rivets (7).
|
|
6
| Pull the side wall trim (4) out of the window seal (5) starting at the bottom.
|
Carefully pull out the side wall trim (4). Do not damage connections in window antennas
Danger of breakage.
|
|
7
| Remove the side wall trim (4).
| The side wall paneling (4) is fastened above with the window with a Velcro strip (8) and inserted below the roof paneling in the front area.
|
|
8
| Pull the seat belt strap out of the side wall trim (4).
|
|
|
9
| Install in reverse order.
|
|
|
Referenced documents