Series
en
ar0920d131007d
Detach/attach intake manifold at cylinder head
Type ar · topic 09.20 · version 0102 · 2004-04-14
Applies to: ENGINE 111.979 in MODEL 902.061 /062, 903.061 /062 /063, 904.062 /063 with CODE (KL8) Pressurized gas reservoir in cargo area with CODE (MS7) NGT (Natural Gas Transporter) sprinter ENGINE 111.979 in MODEL 902.012 /062 /072, 903.012 /013 /022 /062 /063 /072 /073, 904.012 /013 /062 with CODE (KL9) Pressurized gas reservoir underfloor arrangement with CODE (MS7) NGT (Natural Gas Transporter) sprinter
Where it sits
Function group 1 Engine › 09 Air intake, turbocharging › 09.20 Intake manifold, intake manifold preheater — Series 902 (models 012, 061, 062, 072) · Series 903 (models 012, 013, 022, 061, 062, 063, 072, 073) · Series 904 (models 012, 013, 062, 063)
EinPAS 15 Engine › 15.30 Air intake/charging › 15.30.33 Intake manifold/charge air pipe — Series 902 (models 012, 061, 062, 072) · Series 903 (models 012, 013, 022, 061, 062, 063, 072, 073) · Series 904 (models 012, 013, 062, 063)
Also applies to engines/gearboxes: 111 979
AR09.20-D-1310-07D
Detach/attach intake manifold at cylinder head
Intake manifold, intake manifold preheater
Number
Designation
Engine 111.979/ 984
BA09.20-N-1001-02A
Intake manifold to cylinder head
M8
Nm
21
1 Detach gas hose (2) from the gas filter at the gas rail.
Remove gas hose (2) from the gas rail only after removing the intake manifold.
Installation: Use new sealing rings.
2 Remove bracket (1) with gas filter from the intake manifold.
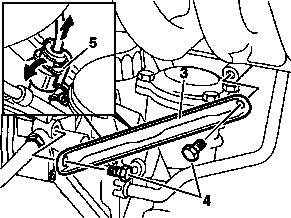
3 Detach connector (5) from the idle speed control actuator.
4 Remove screws (4) and set the bracket (3) aside with the electrical connection.
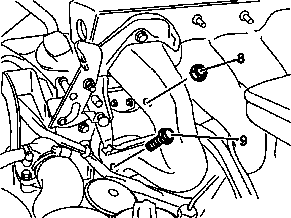
6 Remove screws (9) and nuts (8). Installation: Tighten screws (9) and nuts (8) evenly. Observe the tightening torque.
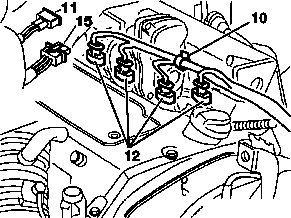
7 Unclip the Omega clip (10).
8 Carefully separate the intake manifold a little way from the cylinder head.
9 Detach plugs (12) from the injection valves.
10 Detach plugs (11, 15) from gas temperature and pressure sensors.
11 Lift off intake manifold (14).
12 Take off seal (13). Installation: Clean the sealing surfaces, install new gasket (13).
13 Install in the reverse order.