
5 | Spare wheel well paneling (without code (669) Spare wheel well on steel rim or without code (690) Emergency spare tire) |
7 | Rear center section paneling |
10 | Trim on trunk floor, front |
11 | Left side paneling |
12 | Right side paneling |
19 | Cross member paneling |
P68.30-3428-06
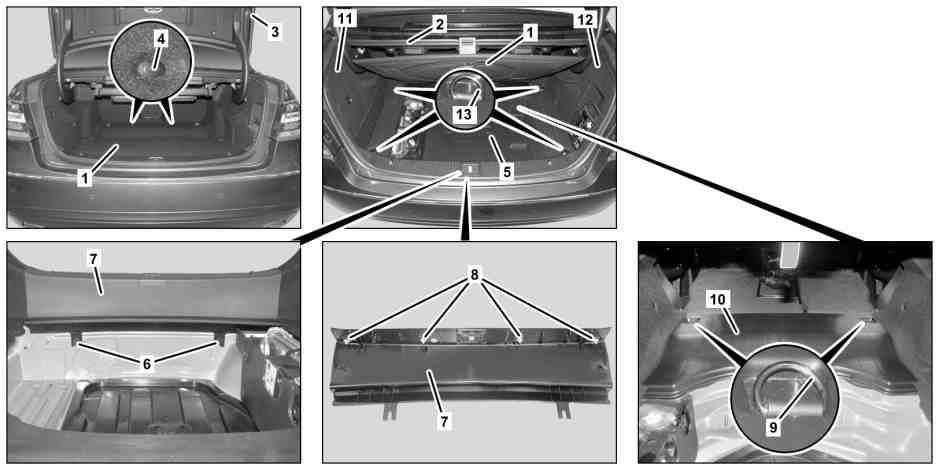
P68.30-3429-09
1 | Cargo space flap | 6 | Nuts | 11 | Left side paneling | ||
2 | Frame seal | 7 | Rear center section paneling | 12 | Right side paneling | ||
3 | Trunk lid | 8 | Clips | 13 | Anchoring lug | ||
4 | Expansion clip | 9 | Anchoring lug | ||||
5 | Spare wheel well paneling (without code (669) Spare wheel well on steel rim or without code (690) Emergency spare tire) | 10 | Trim on trunk floor, front |

P68.30-3430-09
Shown with code (287) Through-loading feature |
11 | Left side paneling | 16 | Electrical connector | E18/4 | Right luggage compartment lamp | ||
12 | Right side paneling | 17 | Electrical connector | E18/5 | Left luggage compartment lamp | ||
14 | Expansion clips | 18 | Expansion clip | ||||
15 | Nut | 19 | Cross member paneling |
Danger ! | Risk of injury caused by fingers being jammed or pinched when removing, installing or aligning hoods, doors, trunk lid/rear-end door or sliding roof. | No parts of the body or limbs should be within the operating area when the components are moving. | |
| Notes on sensor system for trunk lid opening/closing | ||
| Remove/install | ||
1.1 | Lift load compartment flap (1) and hook into sealing frame (2) on trunk lid (3) | If front trunk floor paneling (10) is not removed. | |
1.2 | Remove expansion clips (4) and load compartment flap (1) | If front trunk floor paneling (10) is removed. | |
Clip remover | |||
2 | Remove spare tire well paneling (5) | Model 212.0/1 | |
3 | Loosen nuts (6) | Do not unscrew nuts (6) completely. | |
4 | Unclip rear center section paneling (7) with assembly wedge from clips (8) and remove upward | Mounting wedge | |
5.1 | Unlock rear seat backrest and push forward until left side paneling (11) and right side paneling (12) is exposed behind rear seat backrest | Model 212.0/1 | |
5.2 | Fold over left and right rear seat backrest | Model 212.0/1 | |
6.1 | Remove anchoring lug (9) on left and right on front trunk floor paneling (10) | Model 212.0/1 | |
Screw/bolt for tie-down eye | |||
6.2 | Remove anchoring lug on left and right on front trunk floor paneling (10) | Model 212.0/1 | |
On vehicles without code (287) Through-loading feature, anchoring hooks are installed instead of anchoring lugs (9). | |||
Screw/bolt for tie-down eye | |||
7 | Remove front trunk floor paneling (10) | ||
8 | Remove anchoring lug (13) or anchoring hook from left side paneling (11) and right side paneling (12) | On vehicles without code (287) Through-loading feature, anchoring hooks are installed instead of anchoring lugs (13). | |
Screw/bolt for tie-down eye | |||
9 | Remove expansion clips (14) on left side paneling (11) and right side paneling (12) | Clip remover | |
10 | Unscrew nuts (15) | ||
11 | Disconnect electrical connector (16) from left trunk lamp (E18/5) | ||
12 | Disconnect electrical connector (17) from right trunk lamp (E18/4) | ||
13 | Loosen from left side paneling (11) and right side paneling (12) in lower area of wheel wells, pull toward center of trunk and remove | ||
14 | Remove expansion clip (18) from crossmember paneling (19) | Clip remover | |
15 | Remove cross member paneling (19) | ||
16 | Install in the reverse order |


452 589 01 63 00
Clip remover
110 589 03 59 00
Mounting wedge
Henviste dokumenter
- ah8061p000101a Oplysninger om HANDS-FREE ACCESS
- as0000z001101a Fare for personskade pga. fastklemning eller knusning af fingre ved af-, påmontering og indstillingsarbejde på motorhjelm og bagklap, døre, dæksler og soltag.