Repair materials
Number | Designation | Order number |
BR00.45-Z-1071-02A | Adhesive tape roll, gray Tesa tape, 50 meters 0.3X50, 236 mm | A 001 989 17 85 |
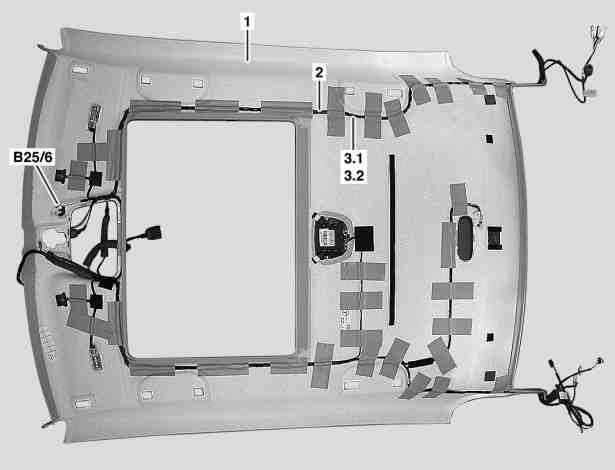
P68.30-2813-06
Shown on model 209.3 with code (414a) Electric glass tilting/sliding roof and code (220a) Parktronic system (PTS) and code (882b) Interior monitoring (only with ATA)
1 Headliner
2 Sound system wiring harness
3.1 TELE AID wiring harness (with code (855) TELE AID)
3.2 Telephone wiring harness (with code (273) Preinstallation
D-network portable CTEL or code (329) Preinstallation for AMPS system telephone or code (386) Preinstallation for UHI system portable CTEL or code (388) UHI system portable CTEL or code (498) Japanese version or code (852) Complete preinstallation portable CTEL, on dome or code (853) MB standard telephone or code (854) MB portable CTEL)
B25/6 Sound amplifier microphone
1 Lay new headliner (1) down on suitable subsurface.
2 Place suitable clean spacers, e.g. foamed material or styrofoam pads below new headliner.
Do not use any hard or sharp-edged objects, otherwise covering of new headliner (1) will be damaged.
The foamed material or styrofoam pads prevent the new headliner (1) from sagging when performing the following steps.
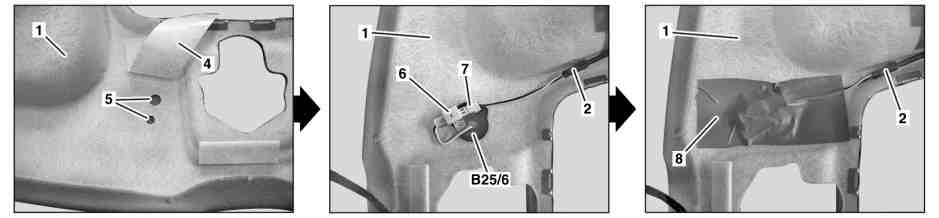
P68.30-2642-07
3 Remove strips of adhesive tape (4)
4 Connect electrical connector (6) for new sound amplifier microphone (B25/6) with electrical connector (7) from new sound system wiring harness (2) and arrest on sound amplifier microphone (B25/6).
5 Align sound amplifier microphone (B25/6) in specified hole pattern (5) on new headliner (1) and glue with approx. 10 cm strips of adhesive tape (8) as shown in figure.
Press on strips of adhesive tape (8) sufficiently, otherwise sound amplifier microphone (B25/6) can loosen
6 Route sound system wiring harness (2) and glue onto new headliner (1) with approx. 10 cm long strips of adhesive tape at an interval of approx. 10 cm.
Do not overcross wiring harnesses (5) and apply sufficient number of strips of tapes, otherwise a short circuit on the headliner can result from chafing
The old headliner (1) serves as template for routing the wiring harness.