Repair materials |
Number | Designation | Order number |
BR00.45-Z-1031-02A | Glazing repair kit 500662 01/03/05/07/09/11 | A 973 670 00 93 |
BR00.45-Z-1074-02A | Adhesive, inside rear-view mirror to windshield | A 005 989 47 71 |
BR00.45-Z-1148-02A | Adhesive, 1K-PU, gray | A 004 989 05 71 |
BR00.45-Z-1180-02A | Repair kit for installing windshields, 1-component adhesive | A 000 670 01 00 |

1 | Level residual adhesive bead at windshield using scraper to a thickness of approx. 1 mm. |
Where previously removed windshield will be reinstalled. |
2 | Remove loose adhesive material. |
Where previously removed windshield will be reinstalled. |
D67.10-0029-01

3 | Clean windshield with commercially available glass cleaner and check for scratches and damage. |
When replacing windshield. |
4 | Clean marked bonding surface (arrow) for inside rearview mirror bracket with acetone. |
When replacing windshield. |
5 | Apply adhesive for inside rearview mirror to marked bonding surface (arrow). |
When replacing windshield. |
Observe usage instructions of adhesive for inside rearview mirror. |
6 | Glue inside rearview mirror bracket onto marked surface (arrow) and press on for 30 s. |
When replacing windshield. |
Observe installation position of dovetail fit. The narrow side should point upward. |
D67.10-0007-01

7 | Position sealing frame (2) at one corner of windshield, press on with thumb and pull onto windshield by moving up and down quickly. |
Do not coat sealing (2) frame with lubricants to facilitate installation. |
D67.10-0006-01

8 | Model 900, 906 |
D67.10-1109-01

9 | Model 900, 906 |
Use application nozzle (14) 2 mm. |
10 | Model 900, 906 |
11 | Model 900, 906 |
D67.10-1110-02

12 | Attach cup suction tools to outside of windshield and center windshield in body shell aperture. |
13 | Glue on adhesive strips (12) at side and at upper edge of windshield (arrows) and cut with a sharp knife. |
14 | Check whether sheet metal flange runs parallel to window all the way around. |
If distance is > 8 mm, | |
| |
remove windshield, reposition sheet metal flange, then check distance again. |
15 | Remove windshield. |
16 | Wipe adhesive area with moist rag from glass cleaning set included and rub dry with dry cloth from glass cleaning set. |
Model 900, 901, 902, 903, 904, 905 |
Model 906 |
D67.10-0003-01
17.1 | Where previously removed windshield will be reinstalled. |
Typ 900, 901, 902, 903, 904, 905 |
Typ 906 |
Shake primer tube min. 30 s before use. To open, hold threaded primer tube connection pointing upwards, and screw felt applicator on to stop. |
17.2 | When replacing windshield. |
Typ 900, 901, 902, 903, 904, 905 |
Typ 906 |
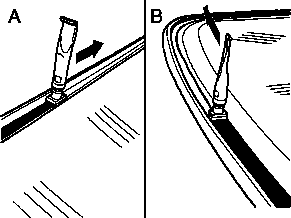
Shake primer tube min. 30 s before use. To open, hold threaded primer tube connection pointing upwards, and screw felt applicator on to stop. Hold application sponge longitudinally at side bonding surfaces of windshield and apply narrowly (A). Hold application sponge transversely at upper and lower bonding surfaces of windshield and apply broadly (B). |
18 | Check primer coat. |
Primer has been applied correctly if screen print in application area is opaque (flashlight test). Allow primer to air-dry for min. 10 minutes. |
If residual adhesive bead on windshield was cut back over 12 h ago, | |
| |
apply primer on residual adhesive bead. |
D67.10-0034-01