AR33.30-W-0535-05A | Mount radial sealing ring and bearing inner race on input shaft | ||
Danger! | Risk of injury to skin and eyes caused by handling hot or glowing objects. | Wear safety gloves, protective clothing and safety glasses, if necessary. |
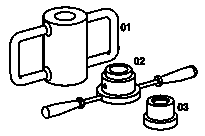
Assembly tool
730 589 05 33 00
Auxiliary repair materials
Number | Designation | Order number |
BR00.45-Z-1114-02A | Loctite 603 adhesive | A 007 989 29 71 |
Assembly note
To install, heat up the needle bearing inner race to approx. 100 oC.
If possible, heat up the needle bearing inner race in a heating oven. If a heating oven is not available, use a heating plate with sufficient heat output (min. 1500 W).
Monitor the temperature of the needle bearing inner race continuously during the heating phase.
Exceeding the specified temperature can result in material damage which will render the needle bearing inner race unusable.
Shortly before the needle bearing inner race reaches the specified temperature, apply the adhesive to the input shaft and attach the radial shaft sealing ring immediately.
The adhesive is included in the repair kit.
The needle bearing inner race must be installed within 5 minutes of attaching the radial shaft sealing ring. If this time is exceeded, the adhesive layer could become detached.
The adhesive layer begins to harden approx. 7 minutes after it was applied.

W33.30-1049-01
1 Remove grips from drive-in sleeve (02).
2 Insert needle bearing inner race (1) into drive-in sleeve (02) with outer chamfer (arrow) pointing downward.
3 Place drive-in sleeve in a heating oven or on a heating plate with needle bearing inner race pointing upward.

W33.30-1044-01
4 Remove adhesive residue from seat of radial shaft sealing ring on shaft and from axial contact surface on linkage arm.
5 Grease seat of radial shaft sealing ring and axial contact surface.
6 Clamp input shaft vertically with inner shaft at the top.
7 Shortly before needle bearing inner race reaches specified temperature, apply adhesive evenly to seat of radial shaft sealing ring (a) and to axial contact surface as shown in illustration.
Apply the adhesive evenly in the following width:
10...14 mm to seat of radial shaft sealing ring (a)
8...10 mm to axial contact surface around shaft

W33.30-1050-01
8 Fit radial shaft sealing ring (2) to shaft of input shaft and push all the way on by hand using adapter ring (03) until it touches linkage arm.
If it is not possible to push on the radial shaft sealing ring by hand, drive the radial shaft sealing ring all the way on by applying light blows to the adapter ring. Use a plastic hammer.
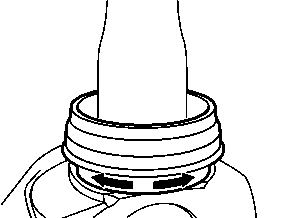
W33.30-1045-01
9 Turn inner race of radial shaft sealing ring sideways several times to distribute adhesive (arrows).

W33.30-1047-02
10 Clean seat of needle bearing inner race at input shaft and lubricate with a drop of oil.
Distribute the oil evenly, avoiding contact with the adhesive.
11 Quickly push heated needle bearing inner race (1) onto shaft of input shaft by hand using drive-in sleeve (02) and immediately drive onto seat using impact hammer (01) until it touches radial shaft sealing ring.
Insert the handles into the drive-in sleeve to ensure that the needle bearing inner race is guided correctly.
Observe the hardening time of the adhesive.
The input shaft must not be installed in the axle housing before the hardening time of
20 minutes has elapsed otherwise it may leak.
Henviste dokumenter
- as0000z000201a Fare for personskade på hud og øjne ved håndtering af varme eller glødende genstande