AR32.25-B-0110G | Remove/install rear shock absorber | 12.02.16 |
Vehicle 979 with Cumbustion engine 612.983, 904.943, 904.970
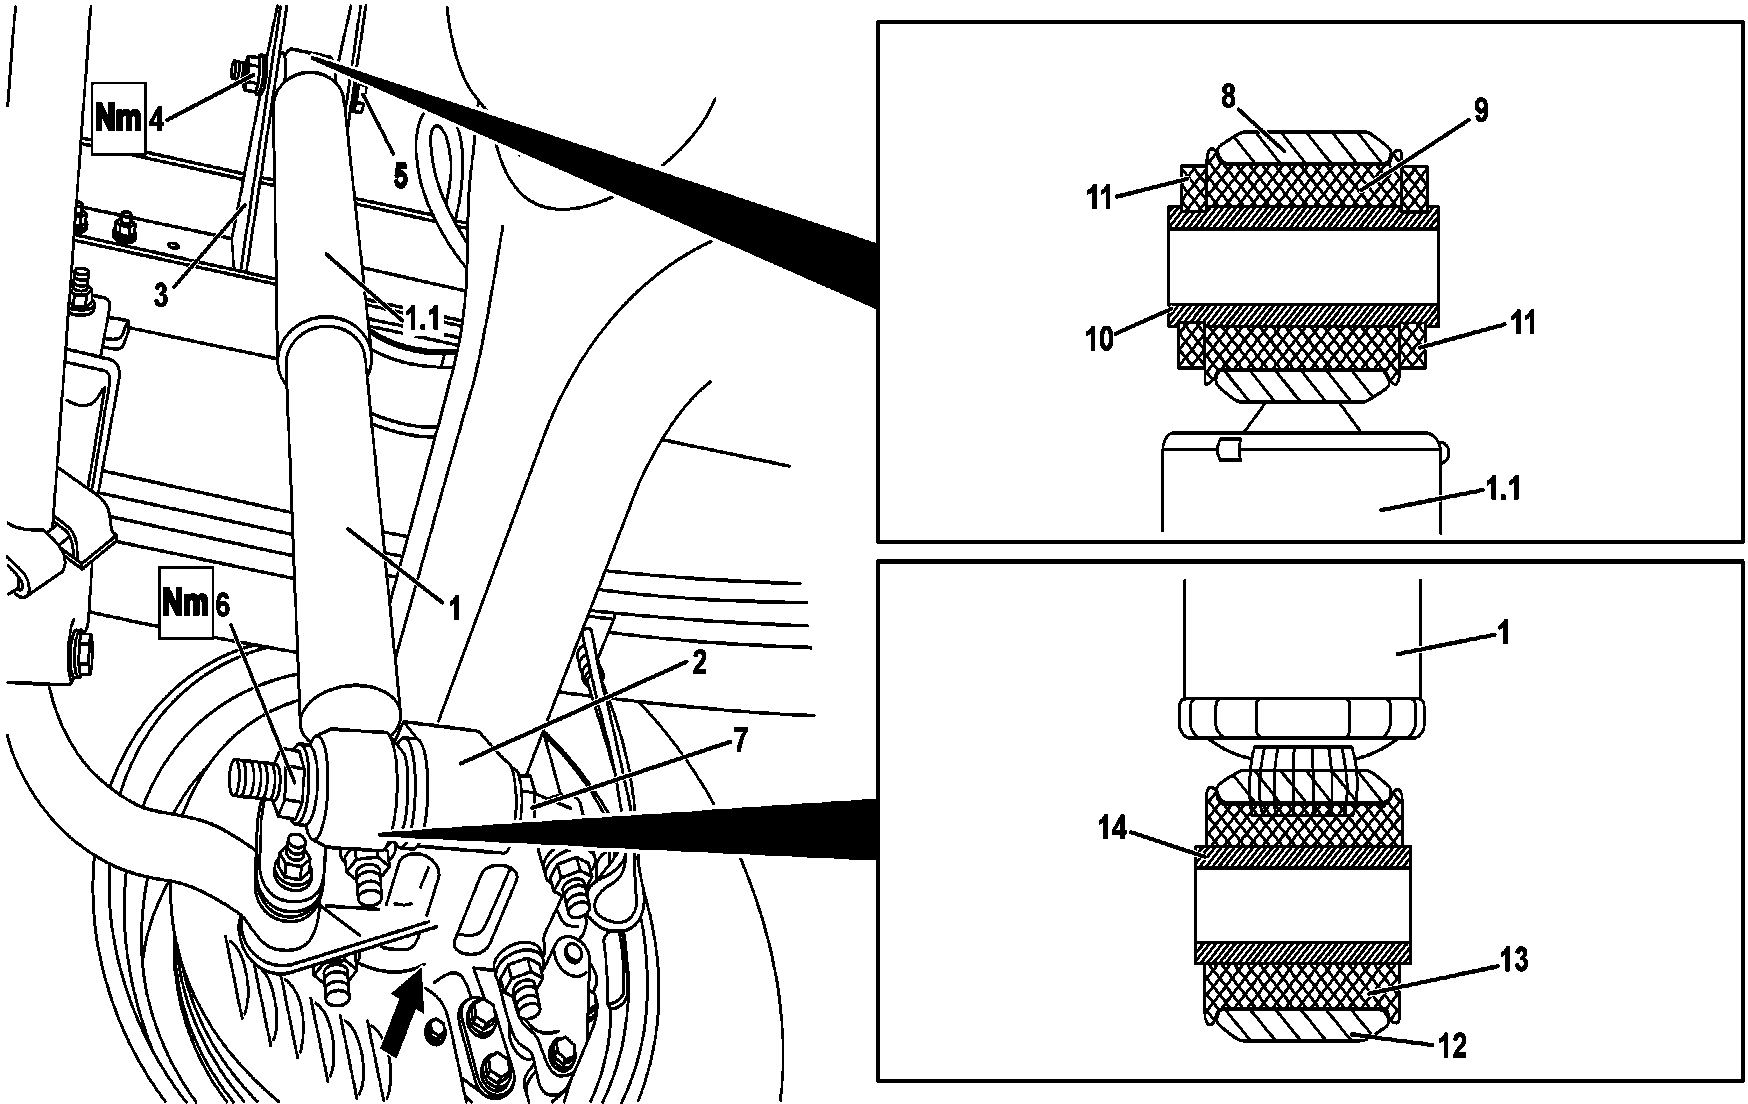
B32.25-0048-09
1 Rear shock absorber tube (lower part)
1.1 Shock absorber dust guard (upper part)
2 Shock lower fastening support
3 Shock absorber upper fastening support (integrated to the chassis cross bar)
4 Upper fastening bolt nut with flange
5 Upper fastening bolt with flange
6 Lower fastening bolt nut with flange
7 Lower fastening bolt with flange
8 Shock absorber upper adapter (eye bolt)
9 Upper mount (elastic bushing assembled on the upper adapter)
10 Metallic spacer bushing (integrated to the elastic bushing)
11 Elastic rings for centralization of the adapter on the support
12 Shock absorber lower adapter (eye bolt)
13 Lower mount (elastic bushing assembled on the lower adapter)
14 Metallic spacer bushing (integrated to the elastic bushing)
| Remove and install | ||
| Important information and preliminary measures | The recommended dimensions must always be observed, with regard to personal safety as well as those of environment protection to avoid accidents. | |
We suggest you to read this document before removing the shock absorbers, as there are various procedures that can be adopted or not, depending on the available equipment. | |||
Considering that the shock absorbers have an essential importance as to the vehicle behavior, the replacement and maintenance of the shock absorbers must always be made per axle, at both right and left sides. | |||
The original shock absorbers are supplied with bushings (9) and (13) assembled, forming a single component. | |||
1 | Put the vehicle in a flat and leveled floor. Choke the front vehicle wheels to avoid its accidental movement | If available in the workshop, the service can be carried out in an appropriate lifter or pit. | |
2 | Turn the general switch off | As this refers to electronic vehicles, always observe the recommendations for this type of vehicles. | |
3 | With the wheels of the vehicle supported on the soil, slightly unfasten the rear axle wheels fastening nuts (unfasten the wheel nuts only if you consider necessary to remove the wheels during the services to facilitate the access to the shock absorbers) | In general, the removal of the wheels is not necessary to carry out shock absorbers removal and installation services. | |
Danger! | Adopt the necessary care measures to lift the vehicle | Risk of severe accidents! | |
Do not lift the vehicle by the axles center point. | |||
4 | Remove the nut (6) and the bolt (7) that fasten the rear shock absorbers to the lower supports (2), respectively at the right and left sides | In order to remove and install the rear shock absorbers, the vehicle must be lifted and supported on the longitudinal members so that the rear axle can be moved as necessary for the works. The shock absorbers must be unfastened at their lower fastening in order to avoid they exceed their normal travel distance and get damaged when the vehicle is supported on the longitudinal members. It is not necessary to remove the rear stabilizer, as it does not interfere in the works execution. | |
10 | Install: Fasten the shock absorbers to the lower support (2) with the bolts (7) and the nuts (6) and tighten up to the specified tightening moment. | ||
| |||
5 | Lift the vehicle and support it on racks conveniently positioned under the longitudinal member. | The vehicle must not be lifted at a single side. Lift the vehicle equally at both sides. | |
6 | If you consider it necessary unfasten the side arms of the rear stabilizer to facilitate the movement of the rear axle | This procedure makes possible to move more the rear axle, a movement limited only by the springs. | |
7 | Remove the wheels, only if you consider this necessary to facilitate the access to the shock absorbers | If the work is being carried out with a modern and adequate lifter on which the wheels remain supported, it will not be necessary to remove the vehicle wheels. | |
8 | Remove the nuts (4) and the bolts (5) that fasten the rear shock absorbers to the chassis cross bars and remove the shock absorbers. | Install: Fasten the new shock absorbers with elastic rings (11) to the chassis cross bars. If necessary, use new nuts (4) and bolts (5) and tighten them up to the specified tightening moment. | |
| |||
| Check | ||
9 | Check the condition of the shock absorbers | Replace the shock absorbers if they present: Leak signs. Worn rods. Crumpled tube. Loosen or deformed adapters (eye bolts). Damaged bushings (mounts) or rings. Operation faults confirmed in the vehicle or by appropriate test equipment. | |
10 | Install in reverse order | ||
11 | Carry out a test drive and check the vehicle behavior |
Rear axle steel suspension
Número | Denominação | Vehicles 979.013/ 016 | Vehicles 979.046 | |||
BE32.20-B-1011-02D | Rear shock absorbers. Length measured between center of bushings | Open | mm | 6183 | 6183 | |
Closed | mm | 3883 | 3883 | |||
Maximum course | mm | 230 | 2303 | |||
Rear axle shock absorber