Modification notes
Transmission housing
Number | Designation | Trans-mission | |
BA26.40-N-1008-01A | Bolt for front section of transmission housing to rear section of transmission housing | Nm | 28 |
Gear set, shafts
Number | Designation | Trans-mission | |||
BA26.50-N-1001-01D | Nut, output flange to main shaft | M121.5 | Nm | 110 | |
M241.5 | Stage 1 | Nm | - | ||
Stage 2 | Nm | - | |||
Stage 3 | Nm | - | |||
M261.5 | Stage 1 | Nm | - | ||
Stage 2 | Nm | - | |||
Stage 3 | Nm | - | |||
BA26.50-N-1005-01D | Bolt, countershaft to countershaft bearing | M141.5 | Nm | 75 | |
M181.5 | Nm | 100 | |||


716 589 00 09 00
Drift
Retainer wrench
SEQ gearshift lever
Pin wrench
000 589 85 63 00
210 589 03 15 00
901 589 00 07 00


210 589 04 15 00
Drift
Drift
716 589 01 15 00
Repair materials
Number | Designation | Order number |
BR00.45-Z-1017-01A | Loctite 5203 sealant | 002 989 71 20 10 |


D26.40-1121-01
The sealing surfaces must be free of oil and grease.
1 Coat sealing surface of front part of transmission housing with specified sealing compound.
2 Apply the prescribed sealant to the contact surfaces on the rear section of the transmission casing in the area adjacent to the vent cap.
D26.40-1122-01


D26.40-1126-01
3 Insert main shifter shaft (20) if necessary.
4 Secure SEQ gearshift lever (17) to main shifter shaft (20) using bolt (9), and secure to rear part of transmission housing using bolts (18).
Observe "top" labeling on SEQ gearshift lever.
Ensure that shift unit is in correct position (arrows).
D26.40-1127-01

D26.40-1133-01
5 Oil cylindrical roller bearing (19) and insert into the drive shaft.

D26.40-1129-01
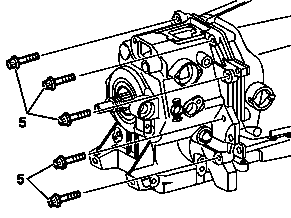
6 Insert rear part of transmission housing with propeller shafts into front part of transmission housing.
The drive shaft, countershaft, main shifter shaft, and guides of the shift unit must slot together.
7 Secure rear part of transmission housing using new bolts (5), .
8 Shift through gears using SEQ gearshift lever.
9 Remove SEQ gearshift lever.
D26.40-1130-01

D26.50-1146-01
10 Use a drift punch to drive in the radial shaft seal (11).
11 Push on output flange (10).
12 Tighten new collar nut (9); when doing so, counterhold using pin wrench, .
13 Lock collar nut using drift.


D26.50-1191-01
14 Tighten bolt (12) .
Counterhold using retainer wrench (13).
15 Install sealing cover of countershaft (14) using drift.
D26.50-1192-01