AR14.40-P-2014-02ECM | Empty, fill AdBlue tank | ||
| 000 588 06 98 00 Cover | ||
| 000 588 01 71 00 Extraction pump | ||
| 000 588 01 71 00 Extraction pump | ||
| 000 588 01 71 00 Extraction pump | ||
| 000 588 01 71 00 Extraction pump | ||
| 000 588 07 82 00 Filling unit | ||
| 000 588 07 82 00 Filling unit | ||
| 000 588 07 82 00 Filling unit | ||
| 000 588 07 82 00 Filling unit | ||
| 000 588 07 82 00 Filling unit | ||
| 000 588 07 82 00 Filling unit | ||
| 000 588 07 82 00 Filling unit | ||
| 000 588 07 82 00 Filling unit |
Filling capacity for BlueTEC (SCR) diesel exhaust treatment |
Number | Designation | Model 207.3 with engine 642, 651 | Model 207.4 with engine 642, 651 | ||
BF14.40-P-1001-01A | AdBlue® tank | Initial fill capacity | Liter | 29,2 | 26 |
Filling capacity - service filling | Liter | 28,2 | 25,5 | ||
Sheet | |||||
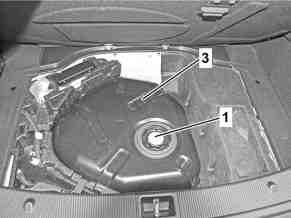
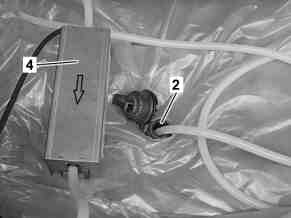
Draining
1 | Switch off ignition and store transmitter key outside of transmitter range (min. 2 m). |
2 | Attach a rear apron protector and expose AdBlue® tank (3) in the trunk. |
3 | Engine 651 in model 207 |
4 | Unscrew cap of AdBlue® filler neck (2). |
Ensure cleanliness when working on the emission control system; contaminants must not be allowed to enter the emission control system. |
5 | Cover area all over around the AdBlue® filler neck (2) with antistatic film. |
6 | Insert extraction hose into AdBlue® tank (3). |
Secure extraction pump (4) against dropping. |
Observe arrow on extraction pump (4) indicating direction of suction. |
7 | Suction AdBlue® with extraction pump (4) and extraction hose out of AdBlue® tank (3), catch it and dispose of it in an environmentally friendly manner. |
8 | Guide extraction hose out of AdBlue® tank (3). |
9 | Screw cap onto filler neck (2). |
10 | Engine 651 in model 207 |
11 | Clean extraction pump (4) and extraction hose. |
Thoroughly flush out extraction pump (4) and extraction hose with water. |
P14.40-2541-01
P14.40-2524-01
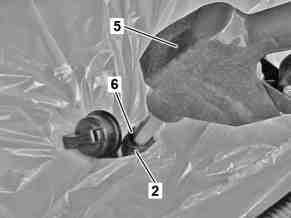
Filling the pump from a large container
The filling tools are designed in such a way as to leave an unfilled space in the AdBlue® tank (3) after switching off. Never pour in further AdBlue® after switching off.
Otherwise damage may occur to the AdBlue® tank (3).
12 | Insert pump nozzle (5) of electric pump unit into AdBlue® filler neck (2) up to stop ring (6). |
13 | Fill AdBlue® tank (3) . |
The pump nozzle (5) switches off automatically when the AdBlue® tank (3) is full. |
14 | Remove pump nozzle (5) from AdBlue® filler neck (2). |
15 | Attach cap to filler neck (2) of AdBlue® tank (3). |
16 | Use suitable means to remove AdBlue® residues and screw cap onto filler neck (2). |
Use only clean, lint-free rags to avoid contaminating the emission control system. |
17 | Remove antistatic film. |
18 | Remove rear apron protector. |
P14.40-2525-01
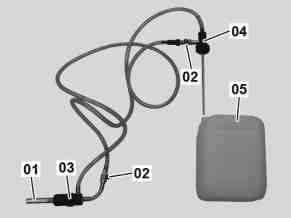
Fill out of the container (05) (10 l can)
The filling tools are designed in such a way as to leave an unfilled space in the AdBlue® tank (3) after switching off. Never pour in further AdBlue® after switching off.
Otherwise damage may occur to the AdBlue® tank (3).
19 | Screw fitting (01) on connection (03) and close valves (02). |
20 | Finger tighten connection (04) on container (05) and connection (03) on filler neck (2) of AdBlue® tank (3). |
21 | Lift container (05), open valves (02) and fill AdBlue® tank (3). |
Repeat process if necessary with further containers (05). No further AdBlue® will flow when the AdBlue® tank (3) is full. |
22 | Close valves (02), unscrew connections (03, 04) and dispose of empty container (05) in an environmentally friendly manner. |
23 | Attach cap to filler neck (2) of AdBlue® tank (3). |
24 | Use suitable means to remove AdBlue® residues and screw cap onto filler neck (2). |
Use only clean, lint-free rags to avoid contaminating the emission control system. |
25 | Remove antistatic film. |
26 | Remove rear apron protector. |
27 | Clean filling tool. |
Thoroughly rinse filling tool with water. |
P14.40-2387-01
Fill from a container (5 l can) with disposable hose
28 | Screw disposable hose finger-tight onto container and onto filler neck (2) of AdBlue® tank (3). |
29 | Lift container and fill AdBlue® tank (3). |
Repeat process if necessary with further containers. No further AdBlue® will flow when the AdBlue® tank (3) is full. |
30 | Unscrew disposable hose from filler neck (2) of AdBlue® tank (3) and dispose of empty container and disposable hose in an environmentally friendly manner. |
31 | Attach cap to filler neck (2) of AdBlue® tank (3). |
32 | Use suitable means to remove AdBlue® residues and screw cap onto filler neck (2). |
Use only clean, lint-free rags to avoid contaminating the emission control system. |
33 | Remove antistatic film. |
34 | Remove rear apron protector. |
Filling from AdBlue® bottle
35 | Unscrew cover from AdBlue® bottle and screw AdBlue® bottle finger-tight onto filler neck (2) of AdBlue® tank (3). |
36 | Press AdBlue® bottle onto filler neck (2) of AdBlue® tank (3) and fill AdBlue® tank (3). |
Repeat process if necessary using further AdBlue® bottles. No further AdBlue® will flow when the AdBlue® tank (3) is full. |
37 | Unscrew AdBlue® bottle from filler neck (2) of AdBlue® tank (3) and dispose of empty AdBlue® bottles in an environmentally friendly manner. |
38 | Attach cap to filler neck (2) of AdBlue® tank (3). |
39 | Use suitable means to remove AdBlue® residues and screw cap onto filler neck (2). |
Use only clean, lint-free rags to avoid contaminating the emission control system. |
40 | Remove antistatic film. |
41 | Remove rear apron protector. |