83-5882 Testing, removal and installation of continuous operation switch, timer, preselector and microswitch
Testing
------------------------------------------------------------------
DBW 2010 heater unit
Testing continuous operation switch:
Operation/requirement | Test result | Remedy |
Switch continuous operation switch to "ON". | Heater unit starts up. If not: | - Check voltage at control unit plug B, terminal 1. - Check, replace fuse F2. - Check, replace diode V2. - Check cables for continuity. - Replace continuous operation switch. |
Testing timer:
Operation/requirement | Test result | Remedy |
Setting preselected time (refer to function description 83-0007). | Heater unit starts up in accordance with the preselected time. If not: | - Check voltage at control unit plug B, terminal 1. - Check, replace fuse F1. - Check, replace diode V1. - Check cable for continuity. - Replace timer. |
Testing microswitch:
Operation/requirement | Test result | Remedy |
Set vehicle heater to hot. | Is voltage present at control unit plug B, terminal 5? If not: | - Check, replace fuse F2. - Check microswitch S3 for continuity, by removing microswitch (refer to page 5). - Check cable for continuity. |
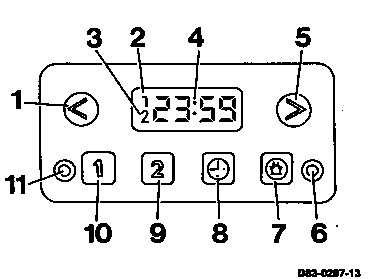
DBW 2012 heater unit
Legend for preselector
1 Putting the time back
2 Code number for 1st preselected time
3 Code number for 2nd preselected time
4 Display panel
5 Putting the time forward
6 Operating indicator lamp (green)
7 ON/OFF switch for instant heat
8 Time
9 2nd preselected time
10 1st preselected time
11 Stand-by indicator lamp (yellow)
Checking time:
Operation/requirement | Test result | Remedy |
Press button (8) for time. | Time appears in the display panel (4). If not: | - Check voltage at the preselector, terminal 8/1. - Check, replace fuse F28. - Check cable for continuity. - Replace preselector. |
Checking time or preselected setting:
Operation/requirement | Test result | Remedy |
Press button (8) for time and simultaneously button (1) or (5). Press button (9) or (10) for preselected times and button (1) or (5). | Time set. If not: Preselected times set. If not: | Replace preselector. |
Testing instant heat:
Operation/requirement | Test result | Remedy |
Press button (7) for instant heat. | Heater unit starts up. If not: Green operating indicator lamp (6) comes on. | - Check voltage on control unit plug A, terminal 1. - Check, replace fuse 28. - Check voltage on preselector, terminal 8/2. - Check, replace switch for water tap S2. - Check cable for continuity. - Replace preselector. - Check voltage on preselector, terminal 8/3. - Check voltage on control unit plug A, terminal 6. - Check cable for continuity. - Replace control unit. - Replace preselector. |
Testing switching on with time preselection:
Operation/requirement | Test result | Remedy |
Set preselected time (refer to function description 83-0007). | Heater unit operates in accordance with the preselected time. If not: Yellow operating indicator lamp (11) comes on. If not: | Refer to "Instant heat" test. Replace preselector. |
Testing microswitch:
Operation/requirement | Test result | Remedy |
Set vehicle heater to hot. | Is voltage present at preselector, terminal 8/2? | - Check, replace fuse F28. - Check switch for water tap for continuity, by removing the switch for water tap (refer to page 6). - Check cable for continuity. |
Testing symbol lighting:
Operation/requirement | Test result | Remedy |
Switch on side lights. | Symbol lighting comes on. If not: | - Check, replace lamp in preselector. - Check voltage at preselector, terminal 8/4. - Check, replace relay K2. - Check cable for continuity. |
Removal and installation of switches and clocks

Continuous operation switch on DBW 2010
1 Disconnect battery.
2 Prise out continuous operation switch (1) using a screwdriver.
3 Disconnect plug connection from continuous operation switch.

Timer on DBW 2010
1 Remove driver's seat.
2 Disconnect plug connections from timer.
Note
Pay attention to assignment of plug connections.
3 Compress expander clips and pull out timer (2).
Installation note
The colored zone (arrow) must point upwards.
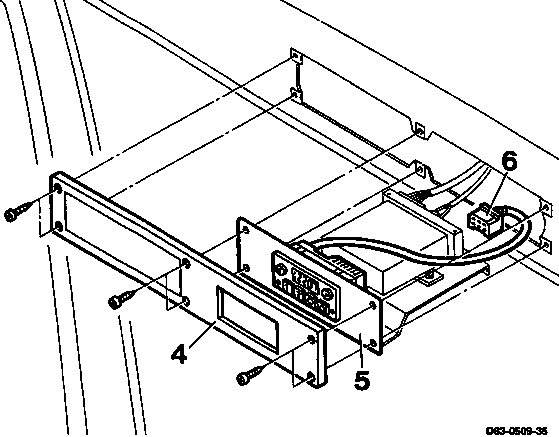
Preselector on DBW 2012
1 Disconnect battery.
2 Remove surround (4).
3 Pull out preselector (5) and control unit.
4 Disconnect plug (6) for preselector from control unit and remove preselector (5).
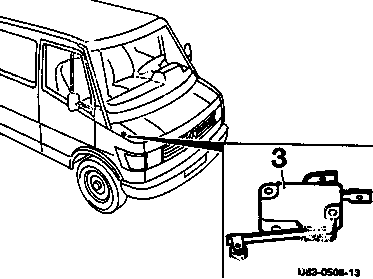
Microswitch T1
Note
The microswitch (3) is located in the heater valve in the footwell on the co-driver's side, below the fuse box.
1 Disconnect the plug and remove microswitch (3).
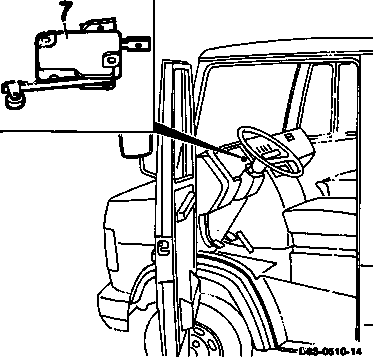
Microswitch T2
Note
The microswitch (7) is located on the heat transfer unit, in the area behind the instrument panel.
1 Remove the instrument panel.
2 Disconnect plug and remove microswitch (7).