27-2010 Removal and installation of transmission

1 Oil filler tube | 17 Speedometer connection fitting | ||
2 Allen screw | 18 Exhaust mount | ||
3 Allen screw | 19 Sealing rings | replace. | |
4 Sealing ring | replace. | 20 Drain plug for transmission | 14 Nm. |
5 Hollow screw | 21 Cross member | ||
6 Sealing rings | replace. | 22 Hex. head bolt for cross member | 45 Nm. |
7 Return line, right | 23 Hex. nut for cross member | 45 Nm. | |
8 Hex. head bolts | 40 Nm | 24 Hex. nut for propeller shaft | 40 Nm. |
9 Shifting rod | 25 Plug for kickdown solenoid switch | ||
10 Retaining clip | 26 Hex. head bolt | ||
11 Sealing rings | replace. | 27 Ground cable | |
12 Hollow screw | 28 Plastic cover | ||
13 Sealing ring | replace. | 29 Hex. head bolt | 40 Nm. |
14 Drain plug | 14 Nm. | 30 Vacuum line | |
15 Plug for starter lockout switch | 31 Hex. head bolts for transmission | 65 Nm. | |
16 Feed line to oil cooler | 32 Torque converter |


Special tools
Types of oil
Automatic transmission fluid (ATF) - Dexron II
(see "Service Product Specifications" page 236.6/7 for approved oils)
Fill quantity 6,2 l
Removal
-------------------------------
1 Disconnect battery.
Note
Disconnect negative pole first.
2 Remove driver's seat and engine hood.
3 Pull out oil dipstick.

4 Unhook control pressure cable (arrow) on control lever.

5 Screw out drain plug (20) with sealing ring (19) and drain transmission oil.

6 Turn engine until drain plug in torque converter is visible in converter housing opening.
Screw out drain plug (14) with sealing ring (13) and drain oil.

7 Screw out Allen screw (2) with washer on oil filler tube (1).

8 Screw out Allen screw (3) with washer (1) and pull out oil filler tube.
9 Remove sealing ring (4).
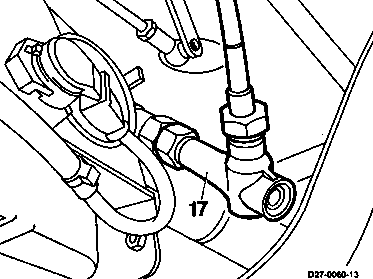
10 Screw off speedometer shaft (17).
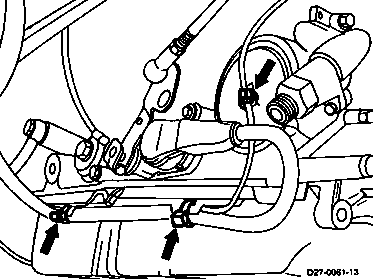
11 Remove cable straps.

12 Turn lock (white plastic ring) (40) upwards (direction of arrow).

13 Carefully press off plug (15) for starter lockout switch with two screwdrivers at exiting cable (arrow) and tab (arrow).

14 Remove clip (10) and unhook shifting rod (9) on range selection lever.

15 Pull off vacuum line (30).

16 Screw out hollow screw (5) with sealing rings (6) for return line, right (7).
17 Remove holder for return line (7).

18 Remove holder for return line (7) on engine, rear right.

19 Remove holder for return line (7) on engine oil pan, front right.

20 Screw out hollow screw (12) with sealing rings (11) for feed line, left (16).
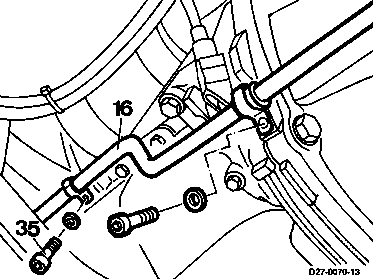
21 Remove holders for feed line (16).
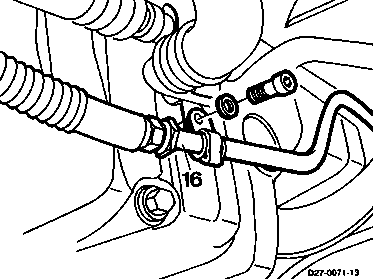
22 Remove holder for feed line (16) on engine oil pan, front left.

23 Remove exhaust at exhaust mount.

24 Remove ground cable (27) and exhaust mount (18).

25 Disconnect plug connector (25) for kickdown solenoid valve.

26 Screw out hex. head bolts (8) with lock washers and hex. nuts (24).
27 Move propeller shaft to side.

28 Remove cross member (21).

29 Remove plastic cover (28).

30 Screw out hex. head bolts (29) (driver plate, torque converter).

31 Screw out bottom hex. head bolts on transmission.
32 Insert plastic retaining pin (arrow) for torque converter and tighten by turning one quarter turn clockwise.
Note
The plastic retaining pin is intended to prevent the torque converter from falling out.
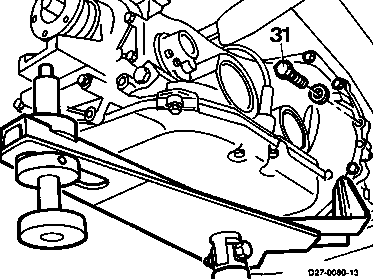
33 Raise transmission slightly with pit lift attachment.
34 Screw out all hex. head bolts (31) with washers at circumference of transmission.
35 Push transmission toward rear and lower carefully.
Attachment 116 589 06 62 00
36 Remove transmission from removal and installation jig.
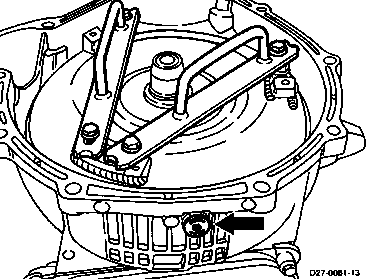
37 Position transmission in vertical position.
38 Turn plastic retaining pin (arrow) for torque converter 1/4 turn to left with 8 mm Allen wrench and remove.
39 Install handle for torque converter.
Handle 126 589 01 62 00

40 Pull out torque converter (32) and remove handles.

Note
If the transmission oil has a burned odour or contains particles from the friction linings, flush the torque converter, oil cooler lines and oil cooler.
41 Flush torque converter. For this purpose fill with 1 liter of cleaning fluid, insert flushing mandrel into torque converter and turn with electric drill at low speed for approx. 2-3 minutes.
Then drain cleaning fluid through drain plug (14).
Repeat flushing procedure 2 - 4 times until cleaning fluid drained out no longer contains any contamination.
Flushing mandrel 116 589 00 15 00
42 Flush oil cooler and oil lines with cleaning fluid and then blow out thoroughly.

Installation
-------------------------------
1 Install handles on torque converter.
2 Coat outside of input flange (arrow) with long life grease, slide on torque converter (32) and remove handles.
Note
Slide on torque converter so that teeth on input shaft engage with teeth in torque converter.
Handle 126 589 01 62 00

3 Measure dimension "A" from torque converter (32) to transmission housing.
Note
Distance "A" should be 9 mm.

4 Insert plastic retaining pin (arrow B) and turn to right 1/4 turn with 8 mm Allen wrench.
Note
The plastic retaining pin is intended to prevent the torque converter from falling out.
5 Turn torque converter so that one of the three threaded plates (arrow A) points toward the plastic retaining pin.
Grease centering pin lightly.
Note
This installation position for the torque converter facilitates installation of the hex. head bolts from the driver plate to the torque converter.
6 Lift transmission onto removal and installation jig.
7 Raise transmission with pit lift to engine height and slide forward until torque converter housing contacts engine.
8 Insert all hex. head bolts (31) with washers and tighten.
Lower pit lift.
Attachment 116 589 06 62 00
9 Tighten lower hex. head bolts on transmission.
10 Remove plastic retaining pin (arrow).
11 Tighten hex. head bolts (29) (driver plate, torque converter).
12 Tighten drain plug (14) on torque converter with new sealing ring (13) to specified torque.
13 Install plastic cover (28).
14 Install drain plug (20) in transmission with new sealing ring (19) and tighten to specified torque.
15 Screw on propeller shaft.
16 Tighten hex. head bolts (8) with lock washers and hex. nuts (24) to specified torque.
Open-end wrench 126 589 00 01 00
17 Position cross member (21) and tighten hex. nut (23) with washer.
18 Tighten hex. head bolts (22) to specified torque.
19 Attach plug connector (25) to kickdown solenoid switch.

20 Install exhaust mount (18) and ground cable (27).
21 Install exhaust on exhaust mount.
22 Screw feed line (16) front left to engine oil pan.
23 Install mounts for feed line (16) on engine and transmission housing.
24 Tighten hollow screws (12) with new gaskets (11) for feed line, left (16) to specified torque.
25 Screw return line (7) front right onto engine oil pan.
26 Screw holder for return line (7) onto engine housing.
27 Tighten hollow screw (5) with new gaskets (6) for return line (7), right, to specified torque.
28 Screw on holder for return line (7).
29 Attach vacuum line (30) to modulating pressure box.

30 Hook shifting rod (9) into range selection lever and install retaining clip (10).

31 Attach plug (15) for starter lockout switch.

32 Turn lock (white plastic ring) (40) down (direction of arrow).
33 Attach cable straps.
34 Screw on speedometer connection fitting (17).
35 Install oil filler tube (1) with new sealing ring (4) and tighten Allen screw (3) with washer.
36 Hook control pressure cable (arrow) onto control lever.

37 Fill approx. 4 l of automatic transmission fluid into transmission through filling funnel with filter.
Note
Pull oil filler tube toward rear to attach filling funnel.
Filling funnel 126 589 12 63 00

38 Check oil level with vehicle parked on horizontal surface with engine running. Allow engine to run approx. 1-2 minutes.
Pivot locking lever (41) up and leave up to check oil level.

Note
The oil level in the transmission changes depending on the oil temperature.
When the transmission is at operating temperature (temperature 70-90 °C) the oil level should be between the upper and lower marks (arrow A) on the oil dipstick.
When the transmission is cold (temperature
20-30 °C) the maximum oil level is approx.
10 mm below the bottom mark (arrow B) on the oil dipstick.
Pay extreme attention to cleanliness, because even small quantities of contamination can lead to malfunctions. Do not use wool materials to wipe off oil dipstick (lint).
Add remaining oil required with engine running. Shift through all gears and then back to gearshift lever position "P".
39 Screw oil filler tube (1) onto cylinder head.
40 Install driver's seat and engine hood.
41 Connect battery.
Note
Connect positive pole first.
Odkazované dokumenty
- bb0040p023606a Oleje pro automatické převodovky ATF (specifikace 236.6)
- bb0040p023607a Oleje pro automatické převodovky ATF (specifikace 236.7)
- ra2701d000200x
- ra2701d000300x
- ra2701d000400x
- ra2701d000500x
- ra2701d000900x
- ra2706d000200x
- ra2706d000300x
- ra2706d000400x
- ra2706d000500x
- ra2706d000900x